2. School of Mechanical & Power Engineering, Harbin University of Science and Technology, Harbin 150080, China
In most cases, different kinds of mechanical workpiece in aircraft, ship and automobile, such as gear, bearing crankshaft and other key components sustain cyclic loading. If the machined surface stress is not controlled well, then the bending, torsion, tension and other different external load may cause accident of the workpiece easily[1]. Because the fatigue failure is caused by damage accumulation, unpredictable and the invisible damage forms which determine the risk of fatigue failure[2]. The key to control the fatigue failure of the workpiece is to control residual stress distribution of machined surface. The wear state of cutting tool is closely related with the stress distribution[3]. Tool wear is one of the important research subjects in the process of high speed machining. The research on the wear mechanism of the cutting tool can get the reasonable working conditions of the tool, and then reduce or avoid the abnormal effect of the tool. If the cutting conditions are not well controlled in the hard cutting process[4]. If the tool wear is not well controlled, the instantaneous dynamic load on the blade will suddenly change[5-6], which will make the tool instantaneous fracture or sharp wear[7-8], but also lead to the decline of the machined surface quality[9]. Therefore, in recent years, many scholars have studied the effects of tool wear for the turning process.
Wen[10] made a thorough research on the PCBN tool dry cutting GCr15, and the results revealed that the tool wear formed under different workpiece hardness or cutting speed. Yue[11] studied the mechanism of tool wear in the hard cutting process of die steel. The tool wear rule of PCBN tool cutting tool steel Cr12MoV process was revealed. It also reveals the change rule of cutting tool wear on chip formation mechanism, cutting force, cutting stress and cutting temperature. Roland et al.[12] studied the corner radius on the influence of tool wear, and pointed out that by choosing the appropriate tip radius it can reduce the tool flank wear. Huang et al.[13] designed simulation program for turning process by regression orthogonal experiment, and the FEM simulations were carried out by 3D Deform software. They set up a regression equation between cutting speed, feed rate, cutting depth and tool wear in turning, and the variance analysis was done to verify the reliability of the model[14]. The wear mechanism of CBN tool cutting tool Inconel718 was studied by Costes[15]. Through SME and chemical analysis, it is concluded that the failure of the tool is mainly caused by the adhesion, diffusion, and abrasive wear. The influence of tool radius and tool wear on the residual stress in hard turning bearing steel was studied by Liu et al.[16]. It is found that increases of tool wear has a significant effect on the residual stress. Chen[17] et al. studied the effect of tool wear on the residual stress during cutting process of Ti6Al4V alloy. They obtained different effects of the contact length and chip separation on the residual stress of the machined surface.
The research results are usually focused on the cutting condition optimization or tool wear mechanism analysis in the past. However, few research scholars have conducted the research of cutting tool wear on the surface properties on machined surface[18]. Considering the effects of lubrication and cooling on the cutting process, the cutting force model was established under the assumption that tool is absolutely sharp by Li[19], and the flow stress can be predicted according to the wear of flank face. The influence of residual stress on fatigue life is also studied. He et al.[20] analyzed the effect of residual stress distribution on fatigue by Goodman formula theory and they compared the fatigue relationship between smooth and notched specimens. They also compared the influence degree of residual stress on the two kinds of sample. It is proved that the surface compressive stress will improve the fatigue life of workpiece.
On the basis of these, the following scholars have started the research on the fatigue life of the processed workpiece. Scholars like Javidi et al.[21] finally drew the conclusion that residual stress had a greater influence on the fatigue life than surface roughness by experimental researching the effect of surface integrity on the rotary bending fatigue life, surface residual stress and surface roughness. Sasahara et al.[22] studied the influence of the residual stress and hardness on the fatigue life of different cutting conditions by means of experiments, and got the conclusion that better fatigue properties could be got by using smaller cutting depth, nose radius and negative chamfer tool. Yang et al.[23] analyzed the fluctuation of residual stress and fatigue life through the experiment and they analyzed the relationship between them in the process of grinding. It is concluded that the grinding life is longer, and there is a significant correlation between the residual stress fluctuation and the fatigue life.
During the cutting process, tool wear will inevitably occur, and tool wear will have an important impact on the machined surface residual stress distribution and fatigue properties on the finished workpiece. At present, few scholars have studied the influence of tool wear on the surface characteristics. Therefore, the influences of tool wear on the residual stress and fatigue life of machined surface are studied in the view of the hard cutting process in this study. The research results have a significant function to control the residual stress and prolong the fatigue property of the machined surface in hard cutting process.
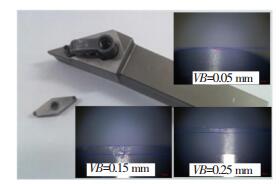
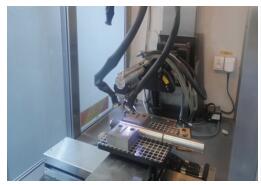
2 Experimental StudyThis experiment was carried out on the CK6150 machine tool, which was produced by Dalian machine tool factory. The material is typical of die steel Cr12MoV. For its good formability, processing characteristics, as well as the safety of quenching, it is widely used in the mold manufacture. The fatigue sample endured heat treatment after quenching tempering before turning experiments. Its final hardness is HRC58-60. The specimen diameter is 25 mm. The cutting tool is a PCBN tool from Diamond Corp, whose brand is MVJNR2020K16. In order to reveal the influence of tool wear on the residual stress, three worn tools were prepared before cutting experiments. The tool wear is 0.05 mm, 0.15 mm and 0.25 mm respectively, as shown in Fig. 1. Cr12MoV die steel was conducted measurement on the residual stress by using the iXRD type X-ray diffraction stress testing system of Canadian Proto Company. The residual stress was measured by using X-ray on the surface of the rod under the same processing parameters and the surface residual stress was measured at three points in each 12 mm and circumferential direction at 120 degrees. The axial residual stress test condition of the specimen is shown in Fig. 2. To determine the effect of tool wear on surface residual stress distribution curve, and the residual stress is needed to test the experiment in depth.
|
Figure 1 Wear of cutting tool |
|
Figure 2 Residual stress measurement of the workpiece |
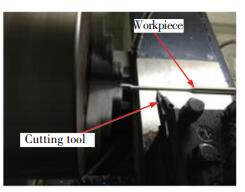
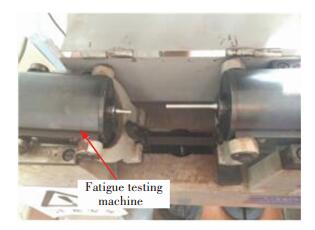
In order to get the fatigue life of workpiece under different stress states, a part of the study is about the bending fatigue test. The fatigue test is completed by PQ-6 bending fatigue testing machine produced by the company of Jinan east test machine. Dumbbell-shaped circular cross-sectional sample is used in the test of fatigue samples. Diameter is 6.5 mm in the middle, as shown in Fig. 3. Experimental process follows the standard GB/T4337—2008 request. The test site is shown in Fig. 4.
|
Figure 3 Rotating and bending fatigue workpiece |
|
Figure 4 Field device of fatigue test |
Processing parameters of different dispersion and the same residual stress distribution are selected as test workpiece in the test of residual stress. The frequency of test is the natural frequency of testing machine and the sample. The test is finished if the sample is ruptured and the loops are recorded. In the process of testing, the weight of 355 N is a benchmark. The loops are recorded when different workpiece is ruptured. For the special workpiece, the loops are much bigger than the regular ruptured time of workpiece, which is not ruptured. The weight of 10 N is increased in the workpiece for saving time, then the workpiece is ruptured.
3 Influence Factors Analysis of Surface Residual StressThe effect of surface residual stress is studied in turning process by the way of residual stress numerical processing and fitting under different parameters and processing methods of dispersion index and distribution curves. The analyzing the effect of residual stress on tool wear mechanism is to provide the evidence for surface fatigue properties of the workpiece.
3.1 Dispersion of Residual StressThe rule of the surface residual stress direction and size is not clear after processing. The residual stress curve and the tensile and compressive stress rule which is got from the different test methods and different metal material has a little deviation, even the residual stress has a fluctuation in the same material and processing state. It is said that the residual stress produced stress dispersion because of the turning mechanism. The dispersion of the residual stress influences the stability of material prosperity. The surface residual under the same parameters changes and three points of the residual stress has a fluctuation largely with different parameters, and this phenomenon is summarized as residual stress dispersion[24-25].
There are many methods of dispersion, such as the range, arithmetic mean value, standard deviation, quarter of deviation and variation coefficient. The range standard deviation and variation coefficient are studied in this paper.
1) The range
The range is shown as deviation between maximum and minimum, and is also the duration span between maximum and the minimum observed value. The formula is:
| $ R = {X_{\max }} - {X_{\min }} $ | (1) |
As two typical absolute discrete degree indexes, full range and standard deviation compared with the original data unit stays the same. The extreme value influence the range, when the middle indictor is regarded as the references of dispersion, and the range does not represent dispersion extent of the whole values.
2) Standard deviation
Standard deviation is a measure of the dispersion of a frequency distribution that is the square root of the arithmetic mean of the squares of the deviation of each of the class frequencies from the arithmetic mean of the frequency distribution. It reflects the dispersion degree among individuals within a group. The calculation formula is:
| $ \sigma = \sqrt {\frac{{\sum\limits_{i = 1}^n {\left( {{x_i} - \bar x} \right)} }}{n}} $ | (2) |
As an indicator of the two typical absolute dispersion, the full range and standard deviation remains unchanged compared with the original data. Because the value of the standard deviation depends on the original data variable level, it is not only related to the mean value of the variable, but also to the degree of dispersion of the original data.
3) Coefficient of variation
The coefficient of variation is a relative degree of dispersion, calculated by the ratio of the standard deviation and the arithmetic mean. The formula is:
| $ cv = \frac{\sigma }{\mu } \times 100\% $ | (3) |
The coefficient of variation is characterized by the fact that it can be used to compare the dispersion of different sets of data, and the size of the coefficient of variation can reflect the relative dispersion of the data. Because the direction of residual stress and the size of the residual stress after processing are not very obvious, this paper evaluates the residual stress dispersion by range, standard deviation and coefficient of variation.
Due to the influence of the cutting mechanism, the residual stress of the machined surface produces the dispersion of the stress value. The residual stress dispersion will have a great influence on the stability of the material's performance. Because in the process of cutting a mechanical force, friction heat makes the surface of the material processed deformation. The difference in cooling time caused by the depth of the surface results in deformation difference and residual stress. In other cases, in the process of high-speed cutting material composition of the organization changed by high temperature, it results in differences in the organization of materials, causing residual stress. In the study of the surface residual stress dispersion and the depth distribution along the surface, combined with the cutting process on the surface and substrate interaction the influence of the cutting process on the surface residual stress is analyzed[26].
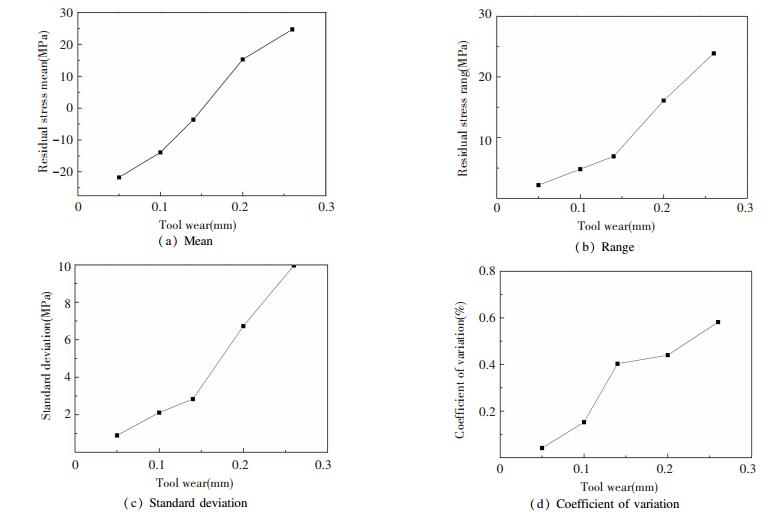
3.2 Effects of Tool Wear on Surface Residual Stress DispersionIn order to obtain the effect of tool wear on residual stress dispersion, and the cutting experiments were carried out at a cutting speed of 20 m/ min, and a depth of cut of 0.15 mm, and a feed rate of 0.15 mm/r. When the tool wear is 0.05 mm, 0.10 mm, 0.15 mm, 0.20 mm and 0.25 mm, the three-point residual axial stress measured by X-ray residual stress diffracts meter. All three-point residual stresses were calculated by Matlab software. The influence of tool wear on the outermost surface residual stress dispersion index was obtained in Fig. 5. As can be seen from Fig. 5(a), (b), (c) and (d): mean, range and the standard deviation are all positively correlated with tool wear. With the increase of tool wear, the residual stress on the outermost surface gradually increases from compressive stress to tensile stress. Because the tool flank wear increases, the thermal effect on the machined surface of the flank and the workpiece increases, which in turn increases the surface phase transformation to thermal deformation. When the deformation is large, the outer surface of the workpiece tensile stress will increase.
|
Figure 5 Influence of tool wear on surface residual stress dispersion |
With the increase of the tool wear, the three indexes which influence the residual stress dispersion on the tool wear are increasing. Also, the residual stress dispersion increases but larger tool wear increases the uncertainty of surface residual stress.
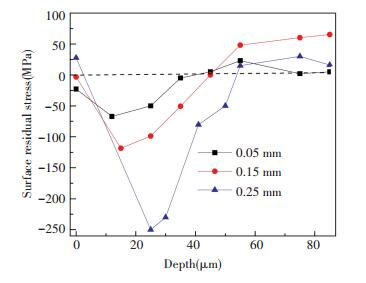
3.3 Influence of Tool Wear on the Residual Stress DistributionResidual stress is an important index for surface integrity, which is a crucial factor influencing fatigue life of the workpiece. Also, ignoring the conditions of material structure, lattice, quenching and uneven, the effect of tool wear on surface residual stress distribution was researched. Under the condition that cutting speed is 20 m/min, cutting depth is 0.15 mm and cutting feed is 0.15 mm/r, the experiment of residual stress along the depth direction is carried out when tool wear is 0.05 mm, 0.15 mm and 0.25 mm respectively. The layer by layer corrosion is carried out by XF-1 electrolytic polishing machine and depth direction is measured by the micrometer. The axial residual stress distribution law in machined surface is shown in Fig. 6. To analyze the influence of residual stress on the fatigue life of workpiece, and the effects of tool wear on residual stress distribution are shown as three curves. In order to count up a specimen of residual stress dispersion and residual stress curve at the same time, the area of the compressive stress of residual stress cure are calculated especially. If the start points of three curves are assumed from zero point, the areas surrounded by residual stress distribution curve under three circumstances with the x-axis are 1 587, 2 998 and 6 368 respectively. The results show that stress increases significantly with the increasing degree of tool wear, the area surrounded by distribution curve.
|
Figure 6 Effects of tool wear on cutting residual stresses |
It is the same mechanism with the effect of tool wear to surface residual stress dispersion, which the phase transition effect and metal softening effect in the machined surface are rather obvious with the increase of tool wear. After the lager rebound effect on surface, surface tension stress with larger internal stress forms the seesaw effect.
4 Influence Analysis of Fatigue Life of WorkpieceAfter machining hardened steel, the effect of residual stress on fatigue life is an extremely complicated mechanism. Based on the theory of fatigue mechanics and mathematical statistics, and this paper establishes a mathematical model of the difference of stress dispersion and fatigue life. By rotating and bending fatigue test, the influence of residual stress dispersion and residual stress distribution curve on fatigue life is analyzed. Through the study of the fracture surface morphology and fatigue life of the workpiece, the effect of tool wear on fatigue life of workpiece is revealed.
4.1 Theoretical Research of the Effect of Residual Stress on Fatigue Based on Fracture MechanicsAccording to the change of Good Man relationship in fatigue theory, the relationship between stress amplitude of the nonzero mean stress and the stress amplitude of the zero mean stress is established. Vector sum of external loading and residual stress is the actual stress at every point. When the law of the external load is certain, the fluctuation of the residual stress of each machining surface is directly related to the normal stress of the material. At the same time, the stress amplitude must be higher than the fatigue limit in the experimental course. Therefore, the stress amplitude of the zero mean stress under the fatigue life is replaced by the fatigue limit, which is obtained by the Eq.(4):
| $ \frac{{{\sigma _\alpha }}}{{{S_N}}} + \frac{{{\sigma _m} + {\sigma _r}}}{{{S_\mu }}} = 1 $ | (4) |
where σm is the average stress type; σr is the type of surface residual stress; σα is the stress amplitude of the non-zero mean stress; Sμ is the fatigue limit of the material; SN is the stress amplitude under the zero mean stress.
In order to further study the influence of residual stress on the life variation, the mathematical method of variable transformation is studied in the paper[27]. The Eq.(4) is deformed and the Eq.(5) is obtained:
| $ \begin{array}{l} {\mathop{\rm var}} \left( f \right) \approx {\left( {\frac{{\partial f}}{{\partial x}}} \right)^2}{\mathop{\rm var}} \left( x \right) + 2\left( {\frac{{\partial f}}{{\partial x}}\frac{{\partial f}}{{\partial y}}} \right){\mathop{\rm cov}} \left( {x,y} \right) + \\ \;\;\;\;\;\;\;\;\;\;\;{\left( {\frac{{\partial f}}{{\partial y}}} \right)^2}{\mathop{\rm var}} \left( y \right) \end{array} $ | (5) |
According to Eq.(5), variance processing of Eq.(4), and the Eq.(6) is obtained:
| $ \begin{array}{l} {\mathop{\rm var}} \left( {{S_N}} \right) \approx {\left( {\frac{{\partial {S_N}}}{{\partial {S_\mu }}}} \right)^2}{\mathop{\rm var}} \left( {{S_\mu }} \right) + {\left( {\frac{{\partial {S_N}}}{{\partial {\sigma _r}}}} \right)^2}{\mathop{\rm var}} \left( {{\sigma _r}} \right) + \\ \;\;\;\;\;\;\;\;\;\;\;\;\;\;\;2\left( {\frac{{\partial f}}{{\partial L}}\frac{{\partial f}}{{\partial G}}} \right){\mathop{\rm cov}} \left( {{S_\mu },{\sigma _r}} \right) \end{array} $ | (6) |
Under the certain conditions, Su is a special property of the material, considering the influence of residual stress on the fatigue stress amplitude of fatigue life, the other arbitrary covariance is zero, so the Eq.(6) can be changed into:
| $ {\mathop{\rm var}} \left( {{S_N}} \right) \approx \frac{{\sigma _\alpha ^2s_u^2}}{{{S_\mu } - {\sigma _m} - {\sigma _r}}}{\mathop{\rm var}} \left( {{\sigma _r}} \right) $ | (7) |
In the Eq.(7) that considering the influence of the residual stress on the amplitude fluctuation under the average stress in the case of other parameters unchanged. In the process of fatigue damage accumulation of rotating and bending fatigue, the crack source of the workpiece is distributed in the outer layer, whether it is crack initiation or crack growth surface layer, and according to the stress life curve exponential relationship, the formula for further analysis is:
| $ {e^{m{S_N}}} \cdot N = C $ | (8) |
| $ B\lg N = A - {S_N} $ | (9) |
where A and B are the constants related to the properties of materials. In the non-exponential region, the life and stress amplitude are linear. It can be known that the stress amplitude can cause the large fluctuation of the life when the stress fluctuation of the material is changed. The effect of stress amplitude fluctuation caused by residual stress is a mathematical relation. In the same part, if the stress value distribution is uneven in different fatigue area, the stress stability of the fatigue will be reduced. When the wave is big, it will directly reduce the fatigue life.
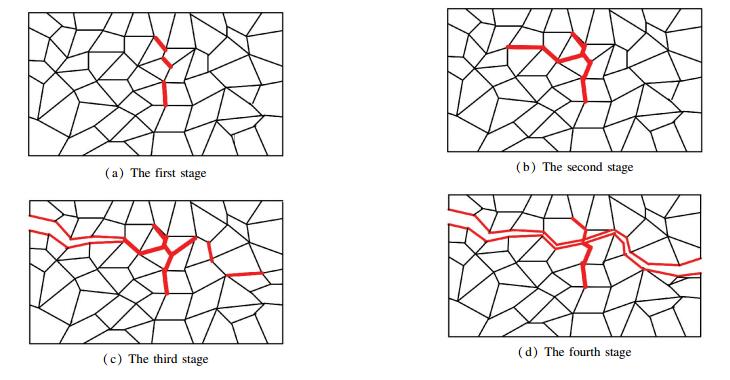
4.2 Analysis of Fatigue Fracture Character-isticsIn the testing process of the workpiece, the effect of the bending moment on the axial tension and compression stress, the crack initiation is divided into two types: the external surface damage and the inner surface damage, as shown in Fig. 7. The surface crack growth of the material includes four stages: crack initiation, crack growth, local crack and the whole transient fault. The reason of the delay time of the material fracture is mainly caused by tensile stress of increased damage and compressive stress of inhibiting damage on the surface of the material.
|
Figure 7 Crack propagation stage |
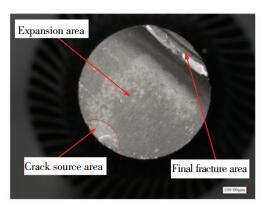
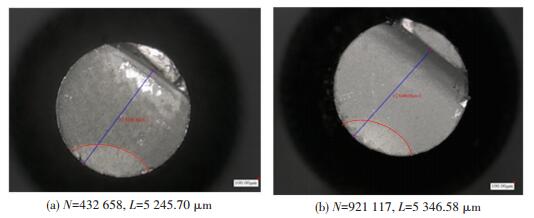
For a whole fatigue fracture, the crack initiation area generally is composed by crack source area, crack expansion area and final fracture area. The typical fatigue fracture is shown in Fig. 8. As shown that the crack source area in fracture of the rotating and bending fatigue specimen is semicircle, and the character of crack source area is relatively light and smooth. This is due to the expansion of its first fracture speed is relatively slow. As the rotating and bending fatigue experiment, workpiece crack is expanding from the crack source, and then form the crack expansion area which the extension speed is slower, and the important sign of this area is arc line that is perpendicular to direction of crack propagation.It is possible to observe the magnitude of the stress at the end of the line and histomorphology due to variations of its shape.
|
Figure 8 Fracture of typical fatigue specimen |
Extension area of all specimen fracture surfaces in this paper is similar to the beach grain and with no obvious shell line. The final fracture area generally occurs in the part which has been deformed. The effect of organizational phase transition is much smaller than that of residual stress in fracture process, so it can be regarded as the ideal contrast condition to study the fracture morphology under different stress states. As shown in Fig. 9, fatigue life (N) was positively correlated with the pressure layer area and the crack growth distance (L).
|
Figure 9 Fatigue fracture morphology under different fatigue life |
4.3 Effect of Tool Wear on Fatigue Life
The fatigue life of different tool wear is shown in Table 1. It is recorded in the table that the residual stress along the surface depth under each parameter is the quantitative value of the compressive stress and the fatigue life of the specimen. With the increase of tool wear, the area of compressive stress increases, and the fatigue life also increases. The reason can be explained as the stable residual stress fluctuation and the large compressive stress layer area can form a strong stress protective layer on the surface of the material. When the workpiece is subject to the external load stress, the stability of the stress protective layer can reduce the fluctuation of the stress amplitude of the cyclic stress. The thickness of the compressive stress can achieve material allowable load ahead of time and the workpiece failure is delayed. The suppression of crack initiation and crack propagation by residual compressive stress is also suppressed. At the same time, the comprehensive properties of the residual compressive stress have a pinning force on the crack growth.
| Table 1 Fatigue life of workpiece under different tool wear |
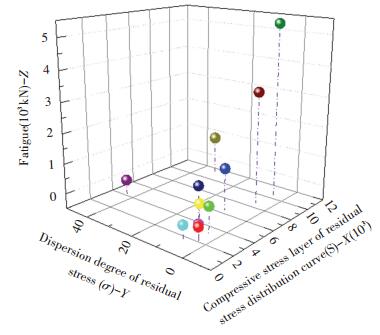
The cycle times of the selected specimens were obtained by rotating and bending fatigue test. The three-dimensional scatter plot of the residual stress dispersion is established. The compressive stress layer area of residual stress distribution curve and the fatigue life of specimen are shown in Fig. 10.
|
Figure 10 3D scatter diagram of fatigue life |
The X-axis is the stress area of the residual stress distribution curve. The Y-axis is the discrete degree index and the standard deviation of residual stress. The Z-axis is fatigue life. Each parameter is represented by each sphere. As can be seen from the figure, with the decrease of residual stress dispersion and the increase of the stress area of the residual stress distribution, the fatigue life increases gradually, which is consistent with the theoretical model. While the dispersion degree of residual stress and the compressive stress layer area of residual stress distribution curve change, there is a certain trend in the change of fatigue life, but the trend is not obvious.
5 ConclusionsFocus on the high strength steel Cr12MoV hard turning process, the effect of tool wear on the surface residual stress and the rotating and bending fatigue life of the machined workpiece is studied. The research results provide a theoretical basis for control of the cutting conditions. The following conclusions could be drawn.
1) The residual stress dispersion increases with the increase of tool wear. Similarly, when the tool wear is within limits, the residual stress increases with the increase of tool wear. And the increase of tool wear can cause the increase of the finished surface compressive stress area and the stress layer depth.
2) A mathematical model of the difference of stress dispersion and fatigue life was proposed. The fluctuation of stress amplitude caused by residual stress was linearly related to fatigue. The scientificity and accuracy of the model were verified by the fatigue bending test.
3) By analyzing the characteristics of rotating bending fatigue fracture crack, we obtained that the crack source area is a semi-circle and the expansion area is similar to the sand grain. Meanwhile, with the increase of the residual compressive stress area, the distance of crack propagation increases and the fatigue life is longer.
4) Rotating and bending fatigue test results show that the larger the tool wear is, the larger the surface residual compressive stress is, and then the fatigue life is longer. On the contrary, the fatigue life of specimen is shorter.
| [1] |
Zeng Chunhua. Fatigue Strength Foundation. Beijing: Science Press, 1986: 5-17.
(  0) 0) |
| [2] |
Qi Guosheng. Estimation of fatigue life of engineering components. Journal of Shandong University of Science and Technology(Natural Science), 2003, 22(zl): 33-36. DOI:10.3969/j.issn.1672-3767.2003.z1.041 (  0) 0) |
| [3] |
Luo S Y, Liao Y S, Tsai Y Y. Wear characteristics in turning high hardness alloy steel by ceramic and CBN tools. Journal of Materials Processing Technology, 1999, 88(1/2/3): 114-121. DOI:10.1016/s0924-0136(98)00376-8 (  0) 0) |
| [4] |
Yue Caixu, Huang Cui, Liu Xianli, et al. 3D FEM simulation of milling force in corner machining process. Chinese Journal of Mechanical Engineering, 2017, 30(2): 286-293. DOI:10.1007/s10033-017-0088-2 (  0) 0) |
| [5] |
Farhat Z N. Wear mechanism of CBN cutting tool during high-speed machining of mold steel. Materials Science and Engineering: A, 2003(1-2): 100-110. DOI:10.1016/S0921-5093(03)00503-3 (  0) 0) |
| [6] |
Yen Y C, Söhner J, Weule H, et al. Estimation of tool wear of carbide tool in orthogonal cutting using FEM simulation. Machining Science and Technology, 2002, 6(3): 467-486. DOI:10.1081/MST-120016256 (  0) 0) |
| [7] |
Nagahanumaiah Mukherjee N P, Ravi B. An integrated framework for die and mold cost estimation using design features and tooling parameters. International Journal of Advanced Manufacturing Technology, 2005, 26(9-10): 1138-1149. DOI:10.1007/s00170-004-2084-9 (  0) 0) |
| [8] |
Yue Caixu, Liu Xianli. Research progress of machined surface integrity for high strength steel cutting process. Journal of Harbin University of Science and Technology, 2011, 16(6): 6-10. DOI:10.3969/j.issn.1007-2683.2011.06.002 (  0) 0) |
| [9] |
Poulachon G, Albert A, Schluraff M, et al. An experimental investigation of work material microstructure effects on white layer formation in PCBN hard turning. International Journal of Machine Tools and Manufacture, 2005, 45(2): 211-218. DOI:10.1016/j.ijmachtools.2004.07.009 (  0) 0) |
| [10] |
Wen Donghui, Liu Xianli, Yan Fuagang, et al. Wear mechanism of polycrystalline cubic boron nitride tools. Journal of Harbin University of Science and Technology, 2002, 7(1): 56-59. DOI:10.15938/j.jhust.2002.01.017 (  0) 0) |
| [11] |
Yue Caixu. Study on tool wear and surface hardening effect in the hard cutting process of die steel. Harbin: Harbin University of Science and Technology, 2012, 28-35. (  0) 0) |
| [12] |
Roland M, Köhler J, Denkena B. Influence of the tool corner radius on the tool wear and process forces during hard turning. The International Journal of Advanced Manufacturing Technology, 2012, 58(9-12): 933-940. DOI:10.1007/s00170-011-3451-y (  0) 0) |
| [13] |
Huang Meixia, Wu Wenge. FEM simulation of high-speed turning based on deform-3D. Tool Engineering, 2008, 42(10): 70-73. DOI:10.3969/j.issn.1000-7008.2008.10.016 (  0) 0) |
| [14] |
Wei Lian, Zhou Liping. Simulation of metal turning process based on deform 3D. Tool Engineering, 2010, 44(8): 29-33. DOI:10.3969/j.issn.1000-7008.2010.08.007 (  0) 0) |
| [15] |
Costes J P, Guillet Y, Poulachon G, et al. Tool-life and wear mechanisms of CBN tools in machining of Inconel 718. International Journal of Machine Tools and Manufacture, 2007, 47(7-8): 1081-1087. DOI:10.1016/j.ijmachtools.2006.09.031 (  0) 0) |
| [16] |
Liu M, Takagi J I, Tsukuda A. Effect of tool nose radius and tool wear on residual stress distribution in hard turning of bearing steel. Journal of Materials Processing Technology, 2004, 150(3): 234-241. DOI:10.1016/j.jmatprotec.2004.02.038 (  0) 0) |
| [17] |
Chen L, El-Wardany T I, Harris W C. Modelling the effects of flank wear land and chip formation on residual stresses. CIRP Annals-Manufacturing Technology, 2004, 53(1): 95-98. DOI:10.1016/S0007-8506(07)60653-2 (  0) 0) |
| [18] |
Aramcharoen A, Mativenga P T. White layer formation and hardening effects in hard turning of H13 tool steel with CrTiAlN and CrTiAlN / MoST-coated carbide tools. The International Journal of Advanced Manufacturing Technology, 2008, 36: 650-657. DOI:10.1007/s00170-006-0899-2 (  0) 0) |
| [19] |
Li K-M, Liang S Y. Modeling of cutting forces in near dry machining under tool wear effect. International Journal of Machine Tools and Manufacture, 2007, 47(7-8): 1292-1301. DOI:10.1016/j.ijmachtools.2006.08.017 (  0) 0) |
| [20] |
He Jiawen, Hu Naisai, Zhang Dingquan. Effects of residual stresses on high cycle fatigue. Journal of Xi'an Jiaotong University, 1992, 26(3): 25-32. (  0) 0) |
| [21] |
Javidi A, Rieger U, Eichlseder W. The effect of machining on the surface integrity and fatigue life. International Journal of Fatigue, 2008, 30(10-11): 2050-2055. DOI:10.1016/j.ijfatigue.2008.01.005 (  0) 0) |
| [22] |
Sasahara H. The effect on fatigue life of residual stress and surface hardness resulting from different cutting conditions of 0.45%C steel. International Journal of Machine Tools & Manufacture, 2005, 42(2): 131-136. DOI:10.1016/j.ijmachtools.2004.08.002 (  0) 0) |
| [23] |
Yang Xiaoping, Richard Liu C, Grandt A F. An experimental study on fatigue life variance, Residual stress variance, and Their correlation of face-turned and ground Ti 6Al-4V Samples. Journal of Manufacturing Science and Engineering, 2002, 124(4): 809-819. DOI:10.1115/1.1511174 (  0) 0) |
| [24] |
Gao Erwei. Experimental Study and Numerical Analysis of Residual Stress Dispersion in Precision Grinding Surface. Shanghai: Shanghai Jiao Tong University, 2008.
(  0) 0) |
| [25] |
Wu Bo, Qin Mengyang, Ye Bangyang, et al. Experimental investigation into scatter of surface residual stress caused by turning. Journal of South China University of Technology (Natural Science), 2012(7): 73-77. DOI:10.3969/j.issn.1000-565X.2012.07.013 (  0) 0) |
| [26] |
Lu Liantao, Zhang Weihua. Review of research on very high cycle fatigue of metal materials. Journal of Mechanical Strength, 2005, 27(3): 388-394. (  0) 0) |
| [27] |
Chen Tao, Li Suyan. Study on the surface integrity and prediction in hard cutting. Journal of Harbin University of Science and Technology, 2012, 17(2): 95-99. DOI:10.3969/j.issn.1007-2683.2012.02.022 (  0) 0) |
 2018, Vol. 25


