2. Foshan Biowin Robotics and Automation Technology Co., Ltd., Foshan 528000, Guangdong, China
The improvement in the deburring efficiency has become a crucial research topic in recent years[1]. The demand for production quality and efficiency becomes more critical as the requirements of mechanical parts in modern manufacturing industry increase[2]. The traditional deburring methodologies are unable to meet the requirements of modern production processes due to various factors, such as, high production cost, low efficiency, and poor manufacturing accuracy[3]. Therefore, it is particularly necessary to develop the technology of robotic deburring.
Industrial robots have been widely used in the field of robotic automation technology. The research community compared the robot automation technology with the traditional Computer Numerical Control (CNC) machine tools and identified the existing issues[1]. These studies also highlight the future potential, characteristics of high flexibility and reconfiguration of these robots, which is an important aspect for automatic manufacturing systems. In Ref.[2], authors generate the deburring trajectory by manual teaching method, which can be accurately tracked based on the established mathematical model and control algorithm. This method is effective for those cases where the workpiece has a large or complex shape, however, it takes a long time to obtain the deburring trajectory, thus leading to a poor deburring efficiency. In order to mitigate this issue, off-line programming method[3-4] is developed, which shortens the time of obtaining the deburring path. However, the deviation usually exists between the established Computer Aided Design (CAD) model and the actual workpiece. Furthermore, when the workpiece produces casting deformation, it not only results in a low deburring precision, but may also damage the deburring end-effector. During the deburring process, the geometric shape and the position of the workpiece may change at any time. Thus, in order to improve the flexibility and adaptability of robotic deburring, initiative control method[5] is proposed. This method is regarded as an excellent solution to cope with the problem of geometric deviation and calibration error. In order to eliminate the influence of rough blank dimension tolerance and machining chucking appliance deviation, an on-line trajectory generation method based on normal-force control[6] is proposed. However, the force sensor is sensitive to the vibration generated during the deburring process. This phenomenon results in a poor accuracy of force vector information and low deburring efficiency. The model-based fuzzy controller method[7] compensates the path deviation for adjusting the inflexibility parameters of the robot and improves the machining accuracy of robotic milling. However, this technique relies on the manual teaching method to obtain the deburring trajectory. This teaching technique is a time-consuming process and cannot improve deburring efficiency. A position-force hybrid control strategy[8-9] is widely used in the field of robotic deburring, grinding, and polishing. The core idea of hybrid strategy is to track the machining trajectory under the position control model and make the cutting force in the normal direction. This control method provides robustness and high machining accuracy, which is applied to remove the burr of complex shapes and non-spherical surfaces. However, this method requires the deburring path primarily based on manual teaching method or off-line programming. In order to improve the efficiency of robotic deburring, Princely and Selvaraj[10-11] proposed a method on the basis of machine vision. The proposed technique overcomes the shortcomings of manual teaching and off-line programming and provides effective solutions for multiple workpiece shapes and mass production. Thus, this technique saves the time during the process of obtaining the deburring trajectory. Princely and Selvaraj[10] use the shape data of workpiece and machining conditions to automatically generate deburring trajectory. In another experiment, the authors divide the workpiece edge contour into multiple straight lines and arcs[11]. It is noticeable that both of these methods are able to solve the problem induced by traditional deburring methods. However, the method proposed by Princely and Selvaraj does not have the ability to analyze the distribution of burr on the workpiece, and high deburring efficiency is not achievable. Moreover, when the workpiece produces casting deformation, it usually leads to inadequate or excessive deburring.
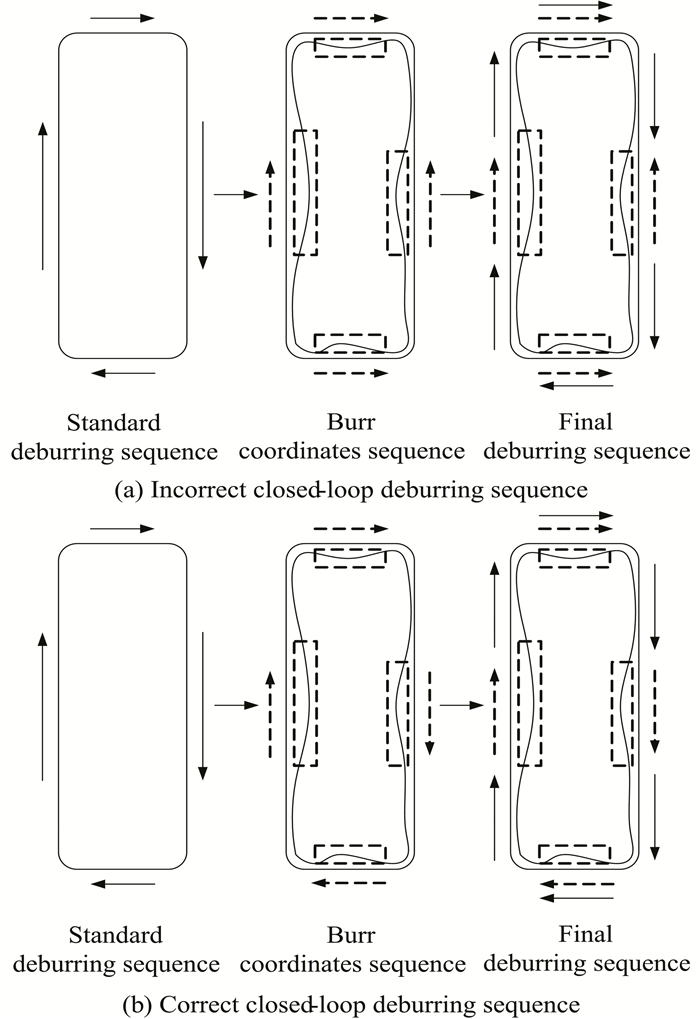
The authors in Refs.[12-13] present a method of reconstructing the three-dimensional image of workpiece based on the vision sensor. The proposed method analyzes the similarity between point cloud data and the actual workpiece size, which assists in automatic tracking and adjusting deburring trajectory in real-time. This method partially overcomes the weaknesses of inadequate or excessive deburring caused by casting deformation. It is noticeable that the workpiece has a complex shape, and the point cloud of this workpiece results in a data that is not easy to match. Thus, a sufficient matching precision is not guaranteed as the method is constrained by the local shape. The robustness of contour tracking can be improved by extracting the contour of the workpiece based on machine vision and using the spline interpolator[14] with S-Curve acceleration and deceleration to generate motion instructions. This method significantly enhances the deburring precision, but the machining accuracy and the efficiency of the robotic deburring is lowered at the same time. In order to monitor the speed and motion accuracy, a control algorithm of non-linear machining speed adjustment is presented in Ref.[15]. However, this technique is still theoretical and is not evaluated by experimental results. In summary, for vision-based robotic deburring method, the workpiece edge contour can be quickly extracted as the deburring trajectory. This method ensures significant computational efficiency in comparison with the conventional methods, such as manual teaching and off-line programming. In order to improve the efficiency of robotic deburring, based on the quantitative information of burr size, the initial step is to insert the position and size information of burr contour into the deburring path. Meanwhile, the coordinates sequence of the burr contour should be in the same direction as the deburring path sequence of the standard workpiece contour, as presented in Fig. 1.
|
Fig.1 Practical closed-loop deburring path sequence |
On the basis of the aforementioned discussion, we conclude that the improvements in the deburring efficiency are achievable in two steps. 1) By extracting the workpiece edge contour accurately as the deburring trajectory. 2) By ensuring the deburring precision. Keeping in view the existing issues of robotic deburring, in this work, we propose a vision-based method for burr contour coordinates to be mapped and inserted in the standard workpiece contour. Additionally, the correct deburring sequence is generated along x and y directions. In order to improve the deburring efficiency, we adjust the deburring speed in real-time based on the quantitative information of burr size.
2 Principle of Burr Contour Coordinates Real-Time Mapping and Sequence GenerationThe process of inserting burr contour coordinates and size information into the closed-loop robotic deburring path is performed in various steps. First, we match the workpiece contour to be processed to the standard workpiece contour and compute the corresponding pixel's distance between the two contours. Then, in real-time, we map the burr contour coordinates to the standard workpiece contour and generate the sequence in the same direction as the closed-loop deburring path. Finally, we adjust the deburring speed in real-time in accordance with the size information of the burr.
2.1 Contour Matching Based on Local Deformable Template Matching AlgorithmThe template matching algorithm is a classical algorithm in the field of machine vision and image processing. The template matching class includes algorithms based on shape, components, correlation, and deformability. In order to adapt the tiny deviations caused by workpiece casting deformation in robotic deburring technology, local deformable template matching algorithm is applied to achieve a high matching accuracy. The algorithm is defined as
| $ \mathit{\boldsymbol{H}} = {\mathit{\boldsymbol{H}}_0} + \mathit{\boldsymbol{P}}(x, y, \theta , l)\mathit{\boldsymbol{F}} $ | (1) |
where, H and H0 represent the deformable template contour and the standard workpiece contour, respectively. In parameter vector P, x and y represent translation, θ represents rotation, l represents scaling, and F denotes the affine-transformation matrix from standard workpiece contour to deformable template contour. The translation parameters which affect the establishment of template contour in the x and y directions are set to 5 mm. The rotation factor θ is set to ±5 degrees, and the scale factor l is set to 1.2. These parameters are determined on the basis of the general deformation range of the actual casting workpiece.
After establishing the deformable template contour, the matching process between the standard workpiece contour and the workpiece contour to be processed is performed. When the optimal value of the process is reached, it is ensured that the matching degree between the two contours is maximized, i.e., the distance between the corresponding pixels of two contours is highly accurate. This optimal value is analogous to obtaining the minimum value of the following energy function
| $ E = {\lambda _1}{E_1} + {\lambda _2}{E_2} + {\lambda _3}{E_3} $ | (2) |
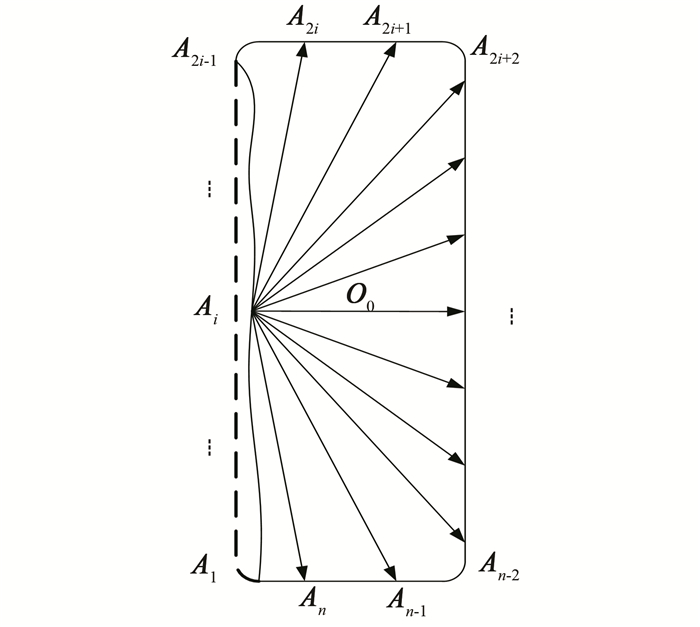
where λ1, λ2, and λ3 represent the non-negative weight parameters defined during the matching process. Ai(i = 2, 3, 4, ...) denotes the pixel point on the deformable contour, as presented in Fig. 2. E1 represents the deformation energy function, E2 represents the smoothness energy function, and E3 represents the external energy function. The energy E3 is mainly determined by the matching degree between the template contour and the workpiece contour that is to be processed.
|
Fig.2 Pixel points on the deformable contour |
The energy functions are defined as follows:
1) The deformation degree of the template contour is determined by the changeable parameters of point Ai(x, y, θ, l), and is defined as
| $ {E_1} = \frac{1}{n}\sum\limits_{i = 1}^n {\sqrt {\frac{{{\mathit{\boldsymbol{A}}_i}{{(x, y, \theta , l)}^2}}}{{2\sigma }}} } $ | (3) |
In Eq. (3), the energy function E1 varies according to the degree of self contour deformation. The numerator of Eq. (3) represents the modulus of parameter vector Ai, and the denominator represents the variance σ of all the points on the deformable contour.
2) The smoothness energy function of the template contour is computed on the basis of distance deviation from the adjacent points to the centroid of the contour. The expression for smoothness energy function is
| $ {E_2} = \sum\limits_{i = 1}^n | |{\mathit{\boldsymbol{A}}_i} - {\mathit{\boldsymbol{O}}_0}| - |{\mathit{\boldsymbol{A}}_{i + 1}} - {\mathit{\boldsymbol{O}}_0}|| $ | (4) |
In Eq. (4), O0 represents the centroid of the contour, and ||Ai-O0|-|Ai+1-O0|| denotes the distance deviation from the adjacent points to the centroid.
3) The external energy function is used to evaluate the matching degree, which represents the deformation trend from the standard contour to the workpiece contour to be processed. The mathematical expression is
| $ \begin{array}{l} {E_3} = \frac{1}{n}\sum\limits_{i = 1}^n {\left( {\max \left| {\frac{{\partial f}}{{\partial {x_i}}}\cos \theta + \frac{{\partial f}}{{\partial {y_i}}}\sin \theta } \right|} \right)} = \\ \;\;\;\;\;\frac{1}{n}\sum\limits_{i = 1}^n {\left| {{\mathop{\rm grad}\nolimits} f\left( {{x_i}, {y_i}} \right)} \right|} \end{array} $ | (5) |
In Eq. (5), E3 represents the gradient magnitude of the points on the deformable template contour, |gradf(xi, yi)| denotes the gradient value of point Ai, and θ represents the gradient direction. Please note that the point Ai maximizes its gradient value by searching one of the points on the workpiece contour that is to be processed.
The minimum value of Eq. (2) is expressed as the sum of the minimum values of the respective energy functions E1, E2, and E3. The global minimum value is defined by the weights λ1, λ2, and λ3. The values of λ1, λ2, and λ3 are estimated on the basis of multiple tests comprising matching process based on the method of controlling the single variable. However, we need to ensure that λ1 +λ2 +λ3=1. When the minimum value of Eq. (2) is obtained, it indicates that the sum of the energy function has achieved the optimal solution. The standard workpiece contour achieves the highest matching precision with the workpiece contour that is to be processed.
2.2 Real-Time Mapping and Sequence Generation of Burr Contour Coordinates on x and y DirectionsAfter calculating the distance between the corresponding pixels of two contours, we set the distance threshold in order to divide the burr contour in different levels. Since the coordinates of the burr contour are out of sequence, the coordinates that are mapped to the standard workpiece contour are also out of sequence. When the robot moves to the coordinates of the burr contour and we consider the standard workpiece contour as the deburring path, the coordinates sequence of the burr contour may contradict the standard closed-loop deburring path. Consequently, the robot moves in the opposite direction. This phenomenon does not allow us to achieve high deburring precision. In addition, this phenomenon also leads to a low deburring efficiency and can damage the deburring tool.
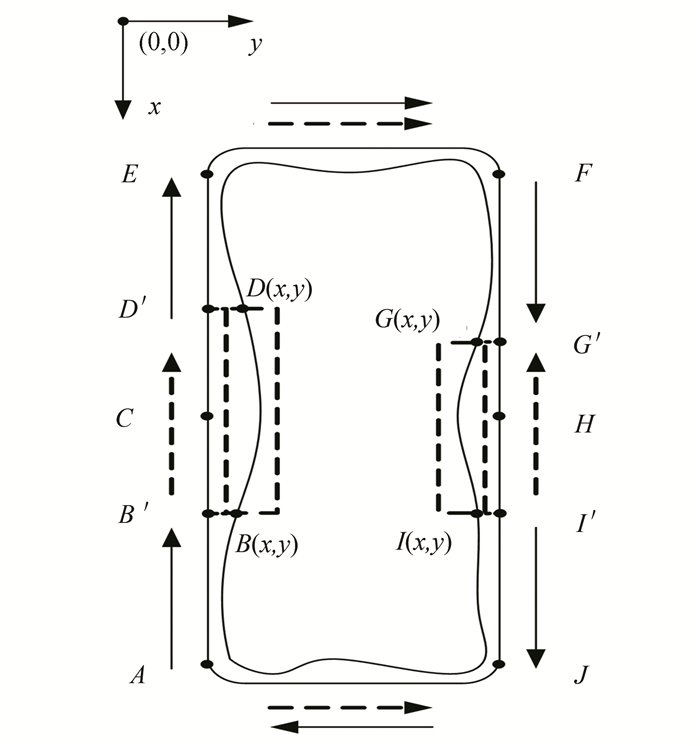
We extract the burr contour in the x direction as presented in Fig. 3. The point B and point D with point I and point G denote the endpoints of the burr contour. It is noticeable that the sequence of the standard workpiece deburring path is ACE and FHJ. When we map and insert the coordinates of point B and point D with point I and point G in the standard workpiece contour, the correct closed-loop deburring path sequence should be AB'CD'E and FG'HI'J. Where, point B' and point D' with point I' and point G' denote the inserted points of burr contour BD and IG. We determine the coordinate's sequence of point B' and point D' with point I' and point G', which is similar as defining the coordinate's sequence of point B and point D with point I and point G. This is defined as
| $ {\sigma _1} = \left( {{B_x} - {D_x}} \right)\mid \left( {{I_x} - {G_x}} \right) $ | (6) |
|
Fig.3 Burr contour coordinates mapping and sequence generation in x direction |
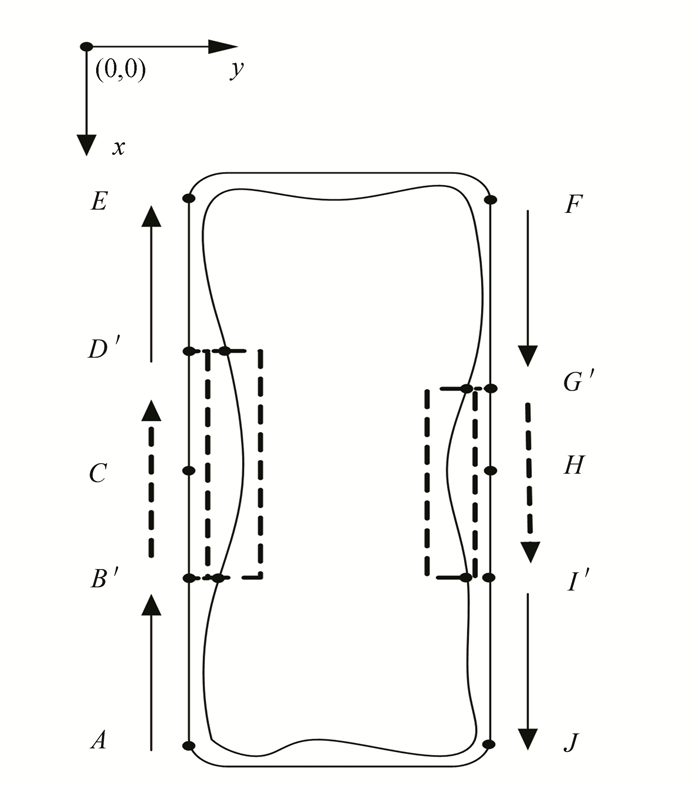
If σ1 < 0, i.e., Bx < Dx and Ix < Gx, we can change the deburring path sequence to AD'CB'E and FI'HG'J by exchanging the coordinates of point B and point D with point I and point G. On the other hand, if σ1> 0, i.e., Bx>Dx and Ix>Gx, similar to the situation presented in Fig. 3, the coordinate's sequence of burr contour is in the same direction as the standard closed-loop deburring path. Thus, the deburring sequence is AB'CD'E and FG'HI'J. According to formula (6), in both cases, the coordinate's sequence of the burr contour that is mapped and inserted into the standard workpiece contour will always be in the same direction as the standard closed-loop deburring path sequence, as shown in Fig. 4.
|
Fig.4 Standard closed-loop contour deburring sequence in x direction |
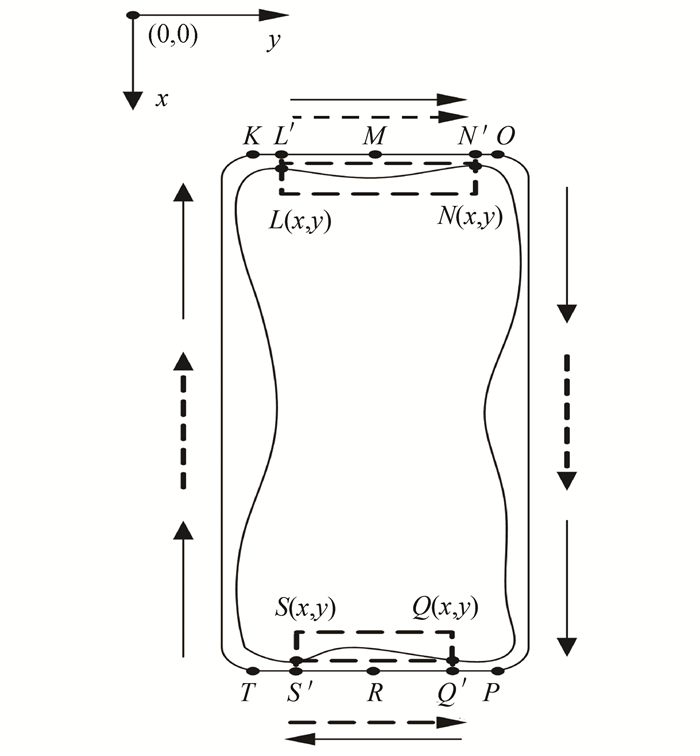
We extract the burr contour in y direction as presented in Fig. 5. The point L and point N along with point S and point Q represent the endpoints of the burr contour. The sequence of the standard workpiece deburring path is KMO and PRT. When we map and insert the coordinates of point L and point N with point S and point Q in the standard workpiece contour. Thus, the correct closed-loop deburring path sequence is KL'MN'O and PQ'RS'T, where, point L' and point N' with point S' and point Q' are the inserted points of burr contour LN and SQ. We determine the coordinate's sequence of point L' and point N' with point S' and point Q'. This is analogous to defining the coordinates sequence of point L and point N with point S and point Q. This is mathematically expressed as
| $ {\sigma _2} = \left( {{L_y} - {N_y}} \right)\mid \left( {{S_y} - {Q_y}} \right) $ | (7) |
|
Fig.5 Burr contour coordinates mapping and sequence generation in y direction |
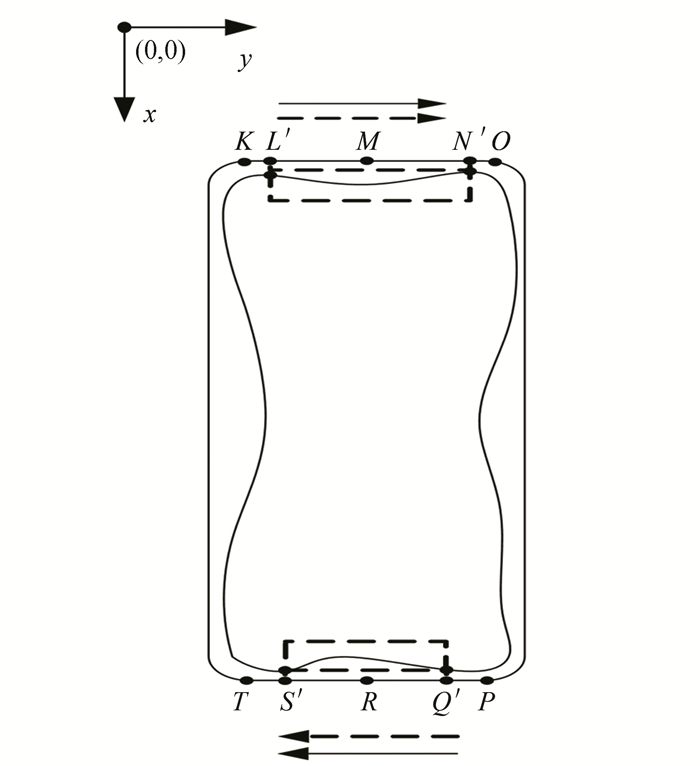
If σ2 < 0, that is, Ly < Ny and Sy < Qy, as presented in Fig. 5, we observe that the coordinate's sequence of burr contour is aligned with the standard closed-loop deburring path in the same direction. Thus, the deburring sequence is KL'MN'O and PQ'RS'T. Contrary, if σ2 > 0, i.e., Ly > Ny and Sy> Qy, we change the deburring sequence to KN'ML'O and PS'RQ'T by swapping the coordinates of point L and point N with point S and point Q. Thus, according to formula (7), the sequence of the burr contour coordinates in both cases are mapped and inserted into the standard workpiece contour. This ensures the same direction as the standard closed-loop deburring path sequence, as shown in Fig. 6.
|
Fig.6 Standard closed-loop contour deburring sequence in y direction |
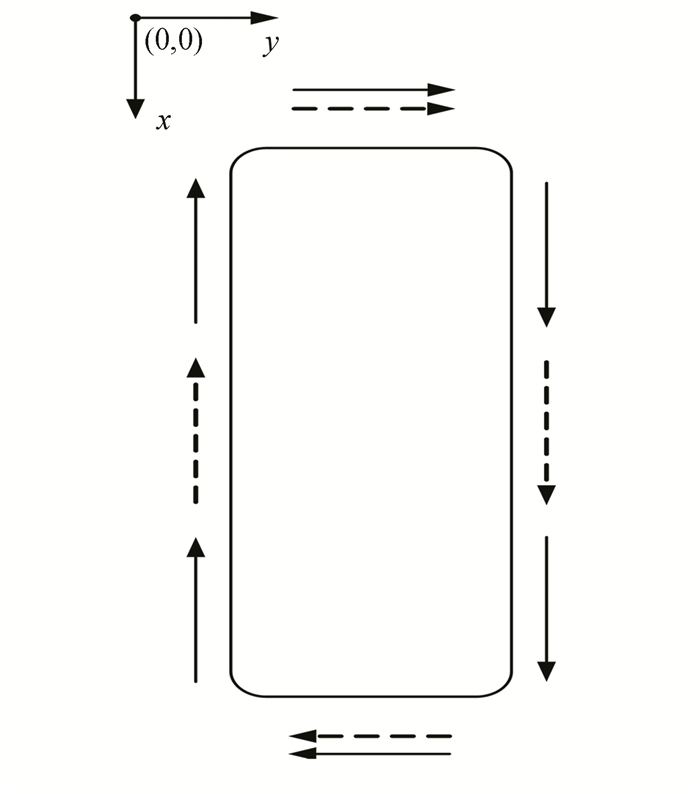
It is noticeable that for the closed-loop workpiece contour, the coordinates of the burr contour and the standard deburring path are in the same sequence in the end. These paths are generated in x and y directions on the basis of formula (6) and formula (7). The final closed-loop deburring path is presented in Fig. 7.
|
Fig.7 Final deburring path sequence for closed-loop contour |
2.3 Deburring Speed Real-Time Adjustment
After the generation of the final closed-loop deburring path, we adjust the deburring speed in accordance with our burr size. We define the size of each burr contour on the basis of the maximum value of all the corresponding pixel distances. This is divided into three levels based on three different deburring speeds, as presented in Fig. 8. The burr size within a certain range of distance threshold processes with the same deburring speed, i.e., large, medium, and small range of burr sizes correspond to low, medium, and high deburring speeds.

|
Fig.8 Levels of burr size and deburring speed division |
3 Real-Time Sequence Generation of Burr Contour Coordinates and Robotic Deburring Experiment 3.1 Real-Time Mapping and Sequence Generation of Burr Contour Coordinates
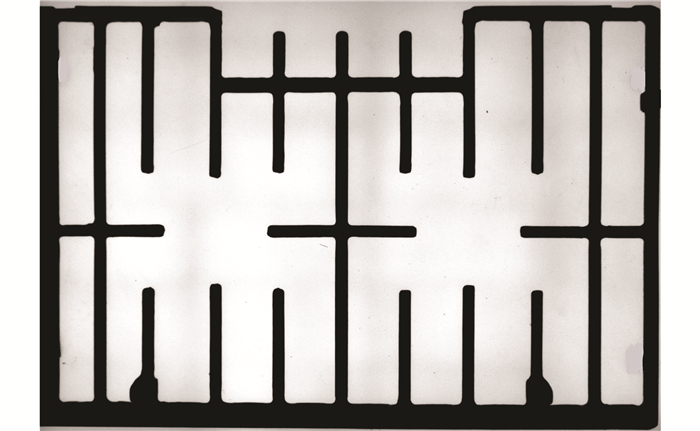
In this experiment, we randomly consider 90 workpieces of same type. The shapes of the workpiece is presented in Fig. 9.
|
Fig.9 Real workpiece for robotic deburring experiment |
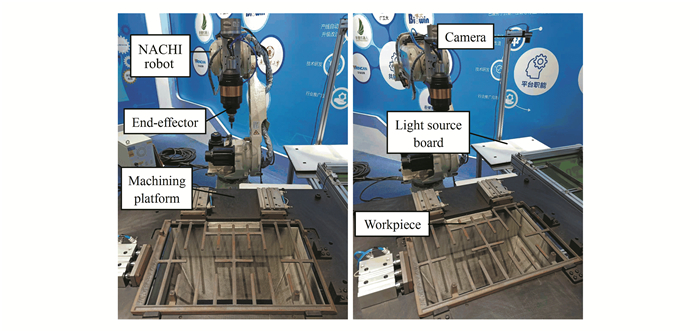
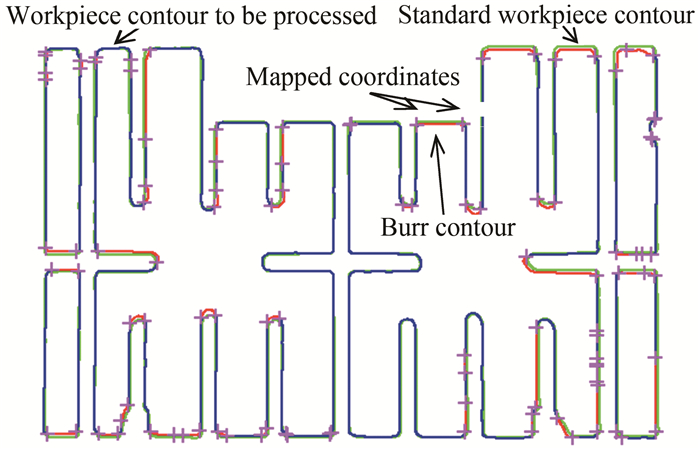
Fig. 9 presents the original image of the workpiece. This image is captured by the camera which is mounted directly above the light source board, as illustrated in Fig. 10. Since we make use of a monochrome camera, when the workpiece is placed on the light source board, the image comprises two colors, i.e. black and white. In order to obtain the high-quality original images, we keep the light source board in a slightly bright state while capturing the images. This phenomenon has different effects. First, it reduces the influence of the reflected light on the quality of the captured image and also results in the reduction of noise interference. Second, it is possible that the workpiece image forms a huge color difference as compared to the background. This process ensures that the workpiece contour is captured clearly. The aforementioned measures ensure the accuracy of the subsequent contour matching and the efficient estimation of burr size is secured. In the case of actual closed-loop workpiece contour, we estimate the burr contour recognition and coordinate's sequence by performing image acquisition, contour matching, and the corresponding pixels distance calculation. This is presented in Fig. 11. Please note that the green contour represents the standard workpiece contour, the blue contour represents the workpiece contour to be processed, and the red contour represents the burr contour.
|
Fig.10 Experimental equipment of robotic deburring |
|
Fig.11 Results of burr contour recognition and mapped coordinates |
3.2 Robotic Deburring Experiment
The experimental equipment for robotic deburring comprises NACHI robot, deburring end-effector, image acquisition device, sensors, machining platform, and control parts. This is shown in Fig. 10.
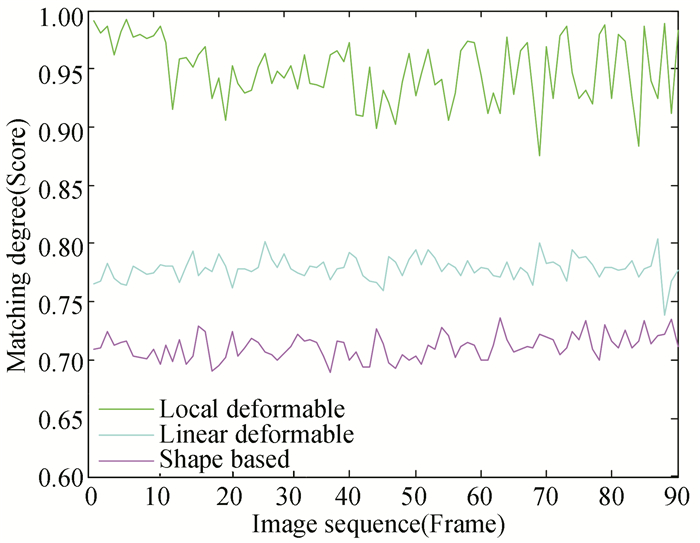
As presented in Fig. 12, since the workpieces used in the experiment suffer from random casting deformation, the template contour library formed by local deformable matching algorithm can be adapted to the deformation caused due to the translation, rotation, and scaling, where a high matching degree is achieved. As compared to the methods which rely on linear deformation and shape, the method of building template contour library based on linear deformable is only able to translate the deformed workpiece contour in x and y directions. So, it is unable to adapt rotation and scaling deformations of whole closed-loop contour, and its matching degree is second. The template contour library based on shape only matches roughly with the workpiece contour with the same shape, as it is difficult to accurately match the workpiece contour considering all directions of deformation, and its matching degree is the lowest. On the basis of high matching degree of local deformable algorithm, the precision information of burr size is obtained after the workpiece contour to be processed is matched with the standard workpiece contour. This process is the preliminary preparation for the subsequent improvement in the deburring efficiency.
|
Fig.12 Matching degree comparison of three methods |
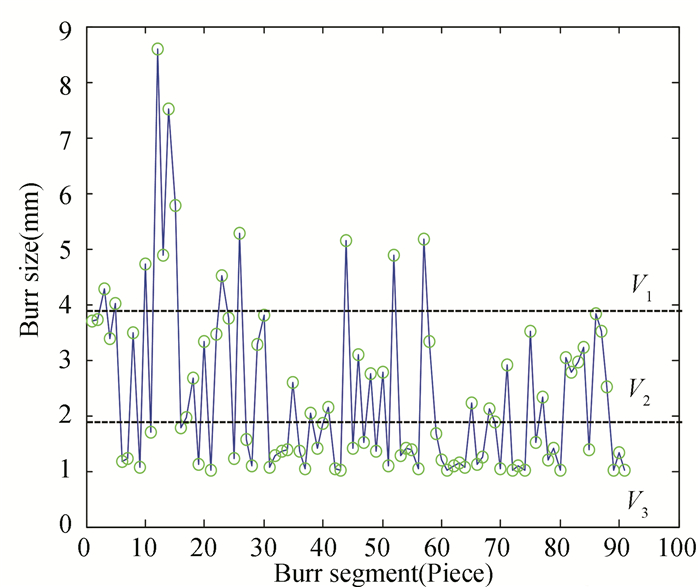
The quantitative value of burr size is presented in Fig. 13. Please note that in this work, we divide the burr size in three levels. For the large, medium, and small size of burr, the corresponding deburring speed is V1=20 mm/s, V2=60 mm/s, and V3=100 mm/s. Please note that V2 represents the conventional off-line programming deburring speed.
|
Fig.13 Value of the burr size and the divided deburring speed |
During the experiment of robotic deburring, we record 20 groups of deburring time, both for adjustable deburring speed and for conventional off-line programming deburring speed. The corresponding results are presented in Table 1. It is noticeable that as compared to the conventional uniform deburring speed, the deburring time of the deburring speed which is adjusted in real-time based on the quantitative information of burr size is shortened.
| Table 1 Comparison of the deburring time for conventional off-line programming deburring speed and adjustable deburring speed (s) |
4 Conclusions and Future Work
In this work, we extract the burr contour and the burr coordinates. The extracted coordinates are mapped to the standard workpiece contour. This work is done on the premise of ensuring robotic deburring precision in case of two-dimensional planer workpiece. We also approximate the correct coordinate sequence of the burr contour in accordance with the judge formulas. The final deburring path sequence of closed-loop contour is generated. Finally, the deburring speed is adjusted in real-time on the basis of quantitative information of the burr size. The experiments performed in this work highlight the following contributions.
1) The burr contour is divided into different levels based on the distance thresholds. The coordinates of the burr contour are inserted into the standard workpiece contour with the same sequence obtained from the final closed-loop deburring path. Thus, the robot adjusts the deburring speed accurately for current deburring position.
2) The deburring speed is adjusted in real-time based on the quantitative information of burr size. As compared to the conventional off-line programming deburring speed, the technique proposed in this work reduces the average deburring time by 15.45%. Therefore, for industrial mass production, the deburring efficiency is greatly improved.
Due to anisotropy of burr shape and the random distribution, we are not completely successful to estimate the optimal method to define the burr size of various shapes. Further research is required to achieve a higher efficiency in the field of robotic deburring.
| [1] |
Iglesias I, Sebastián M A, Ares J E. Overview of the state of robotic machining: Current situation and future potential. Procedia Engineering, 2015, 132: 911-917. DOI:10.1016/j.proeng.2015.12.577 (  0) 0) |
| [2] |
Zheng J Q. Tracking Trajectory Research for Deburring Robot. Wuhan: Wuhan University of Science and Technology, 2016 (in Chinese).
(  0) 0) |
| [3] |
Ma J T. Research on Real-Time Control System of Robotic Deburring off-line Programming Trajectory based on Force Feedback. Zhejiang: Zhejiang University, 2017 (in Chinese).
(  0) 0) |
| [4] |
Wang M F. Design and Research of Automatic Robotic Deburring System. Guangzhou: South China University of Technology, 2018 (in Chinese).
(  0) 0) |
| [5] |
Jonsson M, Stolt A, Robertsson A, et al. On force control for assembly and deburring of castings. Production Engineering, 2013, 7(4): 351-360. DOI:10.1007/s11740-013-0459-1 (  0) 0) |
| [6] |
Zhang J. Dynamic Planning of Robot Deburring Trajectory based on Constant Force Control. Zhejiang: Zhejiang University, 2016 (in Chinese).
(  0) 0) |
| [7] |
Zaeh M F, Roesch O. Improvement of the machining accuracy of milling robots. Production Engineering, 2014, 8(6): 737-744. DOI:10.1007/s11740-014-0558-7 (  0) 0) |
| [8] |
Gracia L, Solanes J E, Muñoz-Benavent P, et al. Adaptive sliding mode control for robotic surface treatment using force feedback. Mechatronics, 2018, 52: 102-118. DOI:10.1016/j.mechatronics.2018.04.008 (  0) 0) |
| [9] |
Hu L, Zhan J. Study on the orthomogonalization for hybrid motion/force control and its application in aspheric surface polishing. International Journal of Advanced Manufacturing Technology, 2015, 77(5-8): 1259-1268. DOI:10.1007/s00170-014-6499-7 (  0) 0) |
| [10] |
Princely F L, Selvaraj T. Vision assisted robotic deburring of edge burrs in cast parts. Procedia Engineering, 2014, 97: 1906-1914. DOI:10.1016/j.proeng.2014.12.344 (  0) 0) |
| [11] |
Princely F L, Selvaraj T. Teach less robotic system for deburring workpieces of various shapes. Journal of Advanced Manufacturing Systems, 2015, 14(04): 247-257. DOI:10.1142/s021968671550016x (  0) 0) |
| [12] |
Villagrossi E, Cenati C, Pedrocchi N, et al. Flexible robot-based cast iron deburring cell for small batch production using single-point laser sensor. International Journal of Advanced Manufacturing Technology, 2017, 92(1-4): 1425-1438. DOI:10.1007/s00170-017-0232-2 (  0) 0) |
| [13] |
Kuss A, Drust M, Verl A. Detection of workpiece shape deviations for tool path adaptation in robotic deburring systems. Procedia CIRP, 2016, 57: 545-550. DOI:10.1016/j.procir.2016.11.094 (  0) 0) |
| [14] |
Chen C Y, Shieh S S, Cheng M Y, et al. Vision-based Pythagorean hodograph spline command generation and adaptive disturbance compensation for planar contour tracking. International Journal of Advanced Manufacturing Technology, 2013, 65(5-8): 1185-1199. DOI:10.1007/s00170-012-4250-9 (  0) 0) |
| [15] |
Ilyukhin Y V, Poduraev Y V, Tatarintseva A V. Nonlinear adaptive correction of continuous path speed of the tool for high efficiency robotic machining. Procedia Engineering, 2015, 100: 994-1002. DOI:10.1016/j.proeng.2015.01.459 (  0) 0) |
 2020, Vol. 27


