Zincalume steel (G550) is widely used because of its high resistance to corrosion, high mechanical strength, and high thermal conductivity[1]. Zincalume steel (G550) is coated with aluminium-zinc alloys (55% Al - 45% Zn; sheet thickness 0.6 mm - standard size for roofing materials), which is produced by the hot-dip process according to the AS1397 standard[2-3]. This study used zincalume steel (G550) to weld for environmentally friendly production of the roofing industry in tropical areas, where some parts of construction still use conventional materials such as clay, polymers, and ferric steels[4]. These materials lack corrosion-resistant property and have low mechanical performance. Thus, aiming to enhance construction quality and reduce industrial wastes in the roofing construction, this paper studies zincalume steel (G550) by joinly using the metal inert gas (MIG) welding and laser beam welding (LBW) to serve this purpose. These two welding techniques are different in observing the microstructure of the weldment regarding travel speed and heat intensity, both of which influence the microstructure activity. The cost of welding is also a major concern in this study. The quality of the weldments under the same cost can be compared. This can provide related industrial fields some reference in future experiments. Heat intensity is also an important part in welding, but this factor is not considered in this study. In previous studies, a number of researchers used MIG welding and LBW for metal joining, which can improve metal joining efficiency and accuracy while reducing joint cracks in materials with low energy consumption. In this study, the microstructure of the welded joint is mainly considered. The microstructure of characterization zones are divided into several parts in the weldments such as coarse grains, fine grains, and critical transition grains[3]. The granular structure of fusion zone (FZ) and heat affected zone (HAZ) are different in heat transfer rate[5]. Heat treatment also influences the modification of the granular structure[6]. LBW process produces narrow weld bead and HAZ, and the massive ferrite are formed in equiaxed grains during the LBW process[7]. Casalino et al.[8] studied dissimilar metals such as the aluminium steel and AISI316 steel by using MIG welding and LBW with different parameters such as laser power (2.5 kW), welding speed(2 m/min), wire-speed(1.2 m/min), welding current (80 A), and welding voltage (24 V). As a result, laser welding significantly reduced crack and produced narrow intermetallic layers. Zhang et al.[9] investigated the columnar grain structure and found that columnar crystals formed in the FZ during heat transfer. The columnar grains on the HAZ interface grew towards the FZ. Thus, the coarse equiaxed grains were produced close to the boundary between the HAZ and FZ[10]. Furthermore, Khotiyan et al.[11] found the dendritic grain is mostly formed in the FZ using MIG welding[12]. However, both MIG welding and LBW have advantages and disadvantages for metal joining process. The main aims of this study are to evaluate the microstructures of zincalume steel (G550) welded joint produced by MIG welding and LBW, and compare the microstructures in the welded pool produced by the these two welding techniques.
1 Experimental Procedures 1.1 Materials and Sample PreparationThe sheets of zincalume steel (G550) (20 mm × 20 mm × 1.2 mm) were welded successfully by MIG welding and LBW on lap joint configuration. The metal sheets with a thickness of 0.6 mm were the most suitable lap joint which are free of certain defects (Fig. 1). The chemical compositions of metal wire and zincalume steel (G550) are listed in Table 1. The samples were ground by silicon carbide (SiC) abrasive papers of three different types (220, 1000, and 2000 grits) to remove the burrs on the joining interface.

|
Fig.1 Configuration joint (front view of closed square in lap jointing) |
| Table 1 Chemical compositions of filler metal and base metal |
1.2 Laser Welding and MIG Welding
In this study, the Ytterbium (Yb)-fiber laser (1070 nm wavelength) with 300 W maximum power output (StarFiber 300, ROFIN-SINAR Technologies Inc., Germany) was used to weld the specimens after clamping a flat position in the customized jig. For MIG welding, the Hero Tech IM1680 (Current range: 40-160 A; Voltage range: 16 - 22 V) inverter MIG welding was used to weld the joints. The specimens were clamped with G-clamp on the welding table for the stability of samples in lap joint configuration.
1.3 Metallographic CharacterizationsAccording to the metallographic analysis, the welding specimens were cut perpendicularly to the welding direction, and were cold-mounted via the resin epoxy mixed with hardener at the ratio of 15∶2 separately. Further, the specimens were gound with different types of SiC abrasive paper (220, 1000, and 2000 grits). Next, the ground specimens were polished with diamond suspensions for scratch-free surface. Finally, these specimens were etched by ferric chloride (FeCl3). The cross-section weld pool was evaluated via scanning electron microscope (SEM) (Phenom ProX, Phenom-World).
1.4 MicrostructureSEM analysis was conducted to observe and evaluate the granular structure in the welded surface of specimens using irradiation of fine electron beam. The irradiated secondary electrons can emit from the welded surface[13].
1.5 Grain Size Measurement (Intercept Method)Heyn/Hillariad/Abrams intercept method counts the number of grains intercepted through the circular grains boundary connections as the mean of length of line used to calculate ASTM E112 grains size number G, as shown in Eqs. (1)-(3)[14].
| $ {\mathit{N}_\mathit{L}} = \frac{\mathit{N}}{{{\mathit{L}_\mathit{T}}}} $ | (1) |
| $ \mathit{l} = \frac{1}{{{\mathit{N}_\mathit{L}}}} $ | (2) |
| $ \mathit{G} = [ - 6.644log10(\mathit{l})] - 3.288 $ | (3) |
where LT(mm) is length of cross line, N is grains intercepted, NL(mm-1) is grains area, l (mm) is mean of length of line, and G is ASTM grain number.
2 Results and Discussion 2.1 Analysis of MicrostructureTable 2 shows the parameter settings for experimental testing. These parameters were automatically set by the Taguchi Orthogonal Arrays (OAs) in L9 (32)(two factors and three levels). The value of the different parameters such as laser power (W), welding speed (mm/s), welding voltage (V), and wire-speed (m/min) used in MIG welding and LBW process had the most significant effect on the weldment penetration. The increase in laser power and welding voltage led to a deeper depth of penetration.
| Table 2 Parameters setting from Taguchi Orthogonal Arrays |
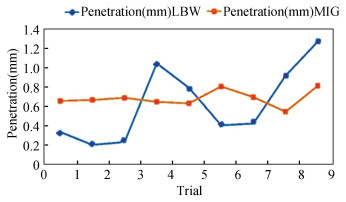
Fig. 2 shows the average penetration of MIG welding is mostly higher than LBW. The MIG welding and LBW process produced maximum penetration at 0.813 mm and 1.26 mm, respectively.

|
Fig.2 Comparison of penetration between the LBW and MIG welding processes (1300dpi resolution) |
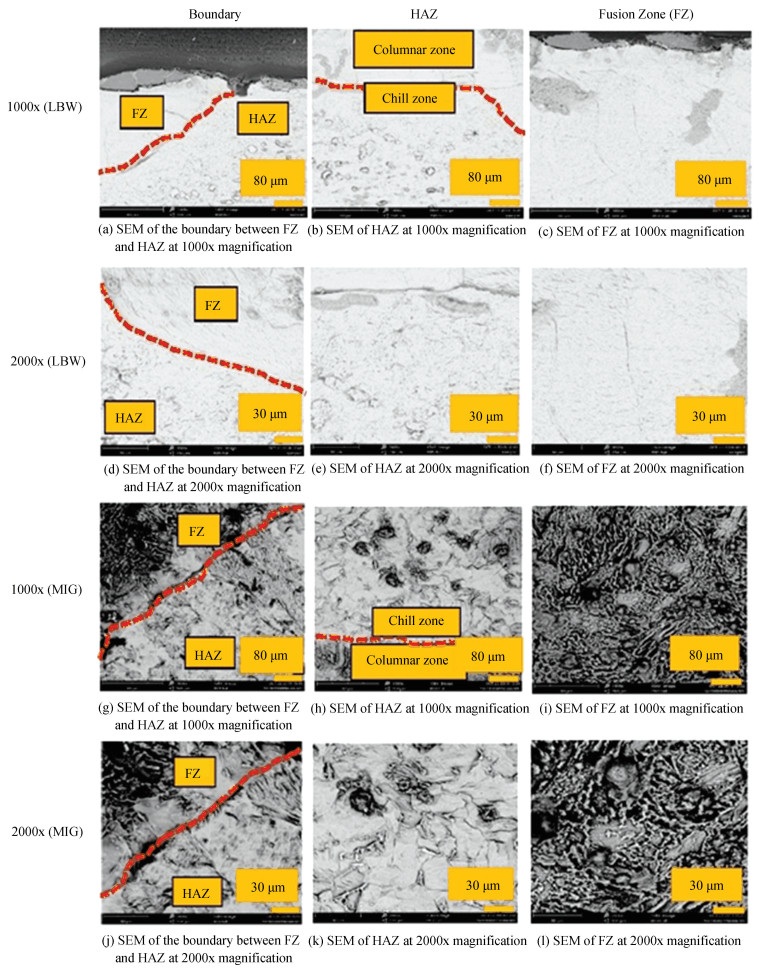
The heat input energy and cooling rate are essential factors in the analysis of microstructure, which exert influence on its mechanical properties such as hardness. Typically, the cooling rate in FZ was significantly slower than those in HAZ and BM. A slow cooling rate is necessary for forming large martensite[13]. Meanwhile, slow cooling rate produces the coarse grains (columnar grains and equiaxed grains)[14]. Moreover, the columnar structures formed near FZ, while the equiaxed grains structure formed between the columnar zone and HAZ[15]. Fig. 3 illustrates the overall microstructure distribution and compares columnar grains among the FZ, HAZ, and boundary at 1000x and 2000x magnification ("x" represents the magnification image quality is the standard degree of magnification in SEM). It can be seen that the columnar grains mostly formed between the chill zone and FZ under a slow cooling rate. Comparison of the columnar zone between the MIG welding and LBW shows that the coarse grains formed in MIG welding was larger than LBW due to the different cooling conditions.

|
Fig.3 SEM of sample 9 treated by LBW (a-f) and MIG welding (g-l)(1300dpi) |
Meanwhile, the martensite (dark surface) structure is also clearly shown in the FZ of MIG, which indicates higher heat input energy produced the same amount of martensite under a slower cooling rate in both MIG welding and LBW processes. This experiment also presents that the FZ produced coarse columnar grains, and the equiaxed grains was formed (at the intersection) between the end of FZ and HAZ during the high temperature (high heat input energy). Zincalume steel (G550) had large thermal conductivity and underwent a solid-state phase transformation when it was cooled. Thus, the melted metal may produce columnar grains when solidified in the weldments. Meanwhile, after the HAZ became equivalent to the high-temperature of FZ, it was concluded that the size of grains grew after heat transfer. These results are in compliance with the research results of Zhang et al.[15] that the columnar grain structures are formed near FZ with high heat input and slow cooling rate; the cooling rate generally decreases from BM to FZ. Furthermore, the growth of parallel dendritic is proportional to the heat flow direction. For laser welding, the columnar grains structure followed the laser beam direction, and under slow cooling rate the equiaxed grains were formed in the chill zone. This result is supported by the research of Janasekaran et al.[16]
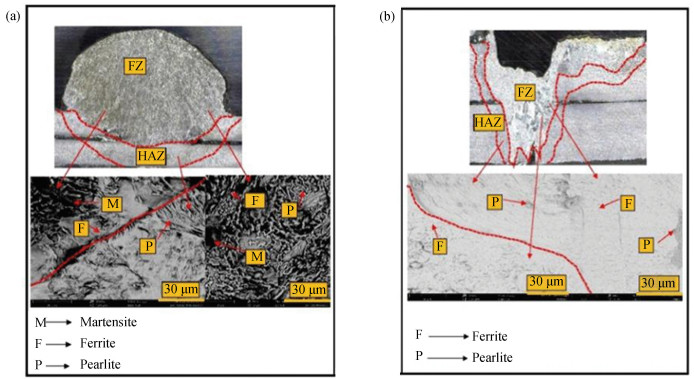
Furthermore, Fig. 4 reveals two different phases of microstructural distribution (pearlite and ferrite) between FZ and HAZ at 2000x magnification. During the joining of zincalume steel (G550), it was observed that the FZ and HAZ formed different heat flow(high temperature) in the weldments[17]. Microstructural observations on the FZ indicates that the martensite (dark surface) formed occupied a much higher fraction compared with ferrite (bright surface) and perlite (bright string) during the MIG welding. In the FZ, a large volume of martensite was obtained, as shown in Fig. 4(a). It is observed that the hardness in weldment increased from BM to HAZ interface, and the hardness reached the maximum in the center of FZ. This means when the phase of martensite increased, the hardness increased slightly from BM to HAZ. During the MIG welding and LBW process, the grains structure was significantly influenced by the heat input energy and compositions of filler metal and laser pulse. The lower heat input energy produced fine grains with a faster cooling rate.

|
Fig.4 Microstructure phases distribution of sample 9 in (a) MIG welding and (b) LBW at 2000x magnification |
Similarly, a higher heat input energy produced coarse grains under a slower cooling rate. A slow cooling rate can decrease the volume of ferrite and perlite while it can create a large martensite surface during the MIG welding and LBW process. Besides, the undercut defect was observed in Fig. 4(b). It can be seen that the undercut occurred at the laser power of 245 W (high power) and welding speed of 16 mm/s (low welding speed) under the high heat input. However, the defect of the undercut can be reduced using high laser power and medium or fast welding speed.
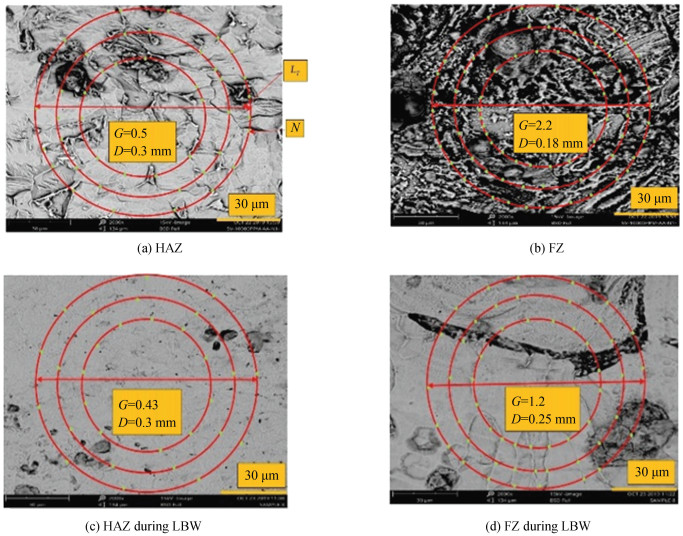
2.2 Analysis of Grain SizeGrain size can influence material hardness and toughness. A significant number of researchers have concluded that the hardness of weldments is inversely proportional to grain size, and the hardness of FZ is mostly higher than those of HAZ and BM[18-22]. HAZ with a larger grain has a variety of microstructure and mechanical properties for the thermal weld cycle. Fig. 5 illustrates the grain sizes of the different zone during the LBW and MIG welding, which were measured by the ASTM standard as expessed by Eqs. (1)-(3). It shows the grain size of HAZ was much larger than that of FZ at 0.3 mm and 0.18 mm in the MIG welding process, respectively. Meanwhile, the LBW produced small grain size of FZ and large grain size of HAZ at 0.25 mm and 0.3 mm, respectively. It means the hardness property significantly increased in the FZ with small grain size and columnar zone (FZ>HAZ>BM). This result is supported by the research of Casalino et al.[8], who found the grain size of FZ is smaller than those of HAZ and BM. Meanwhile, the hardness in weldments increased when the grain size decreased.

|
(G-ASTM E112 grain size number; D-average grain diameter) Fig.5 Comparison of grain sizes at different zones during the MIG welding and LBW processes |
3 Conclusions
Zincalume steel (G550) sheets with similar lap joining and a thickness of 0.6 mm was treated by both MIG welding and LBW processes. The effect of welding parameters on the microstructure of the resultant joints was investigated. The main conclusions are as follows:
1) The penetration of the weld joints reached the maximum value at the laser power of 245 W and the welding speed of 16 mm/s in the LBW process. The maximum penetration of the samples was 1.26 mm (approximately full penetration). In the MIG welding process, the maximum penetration of 0.813 mm occurred at the wire speed of 4.5 m/min and welding voltage of 17.5 V.
2) The columnar grains growth occurred between the mid and end of FZ at high welding laser power of 245 W and 17.5 V in both MIG welding and LBW processes. The growth of parallel dendritic was proportional to the heat flow direction. For laser welding, the columnar grains structure followed the laser beam direction, and under the slow cooling rate (air cooling), the equiaxed grains were formed in the chill zone.
3) The grain size of HAZ was much larger than that of FZ at 0.3 mm and 0.18 mm in the MIG welding process, respectively. Meanwhile, the LBW produced small grain size of FZ and large grain size of HAZ at 0.25 mm and 0.3 mm, respectively. It means the hardness property significantly increased in the FZ with small grain size and in columnar zone (FZ>HAZ>BM). The hardness in weldments increased when the grain size decreased.
4) It can be concluded from the experiment that the hardness property outstood in FZ during the LBW as the size of grains was smaller. However, the tensile strength produced in FZ was due to the increase of the ductility of weldment during the MIG welding process. Thus, the LBW and MIG welding processes have their own advantages which were observed in the experiment, and these results provide industrial fields with future references.
AcknowledgementThis research was supported in part by the SEGi University Sdn Bhd (Grant Number: SEGiIRF/2018-10/FoEBE-17/80) and in kind contribution of University of Malaya.
| [1] |
Paudel P, Dulal S, Bhandari M, et al. Study on pre-fabricated modular and steel structures. SSRG International Journal of Civil Engineering (SSRG-IJCE), 2016, 3(5): 7-14. (  0) 0) |
| [2] |
Cubi E, Zibin N F, Thompson S J, et al. Sustainability of rooftop technologies in cold climates. Journal of Industrial Ecology, 2016, 20(1): 249-262. DOI:10.1111/jiec.12269 (  0) 0) |
| [3] |
Yin L M, Wang J Z, Chen X J, et al. Microstructures and their distribution within HAZ of X80 pipeline steel welded using hybrid laser-MIG welding. Welding in the World, 2018, 62: 721-727. DOI:10.1007/s40194-018-0582-x (  0) 0) |
| [4] |
Muvvala G, Karmakar D P, Nath A K. Online monitoring of thermo-cycles and its correlation with microstructure in laser cladding of nickel based super alloy. Optics and Laser in Engineering, 2017, 88: 139-152. DOI:10.1016/j.optlaseng.2016.08.005 (  0) 0) |
| [5] |
Zhang Y F, Huang J H, Ye Z, et al. An investigation on butt joints of Ti6Al4V and 5A06 using MIG/TIG double-side arc welding-brazing. Journal of Manufacturing Processes, 2017, 27: 221-225. DOI:10.1016/j.jmapro.2017.05.010 (  0) 0) |
| [6] |
Yi J, Wang G, Li S K, et al. Effect of post-weld heat treatment on microstructure and mechanical properties of welded joints of 6061-T6 aluminum alloy. Transactions of Nonferrous Metals Society of China, 2019, 29(10): 2035-2046. DOI:10.1016/S1003-6326(19)65110-1 (  0) 0) |
| [7] |
Pant P, Verma J, Taiwade R V, et al. Influence of advanced laser-arc hybrid welding and conventional MIG process on microstructure, mechanical properties and corrosion resistance of dissimilar joints. Materials Research Express, 2018, 5(6): 066558. DOI:10.1088/2053-1591/aacc1a (  0) 0) |
| [8] |
Casalino G, Leo P, Mortello M, et al. Effects of laser offset and hybrid welding on microstructure and IMC in Fe-Al dissimilar welding. Metals, 2017, 7(8): 282-298. DOI:10.3390/met7080282 (  0) 0) |
| [9] |
Zhang H T, Dai X Y, Feng J C, et al. Interfacial microstructure and mechanical properties of Al/Mg butt joints made by MIG welding process with Zn-Cd alloy as interlayer. Journal of Wuhan University of Technology - Materials Science Edition, 2014, 29(6): 1258-1264. DOI:10.1007/s11595-014-1078-1 (  0) 0) |
| [10] |
Leo P, D'Ostuni S, Casalino G. Hybrid welding of AA5754 annealed alloy: role of post weld heat treatment on microstructure and mechanical properties. Materials and Design, 2016, 90: 777-786. DOI:10.1016/j.matdes.2015.10.150 (  0) 0) |
| [11] |
Khotiyan S K, Kumar S. Investigation of microstructure and mechanical properties of TIG and MIG welding using aluminium alloy. International Journal of Education and Science, 2014, 1(5): 90-96. (  0) 0) |
| [12] |
Cevik B, Koc M. The effects of welding speed on the microstructure and mechanical properties of marine-grade aluminium (AA5754) alloy joined using MIG welding. Kovove Materialy - Metallic Materials, 2019, 57(5): 307-316. DOI:10.4149/km20195307 (  0) 0) |
| [13] |
Chamanfar A, Pasang T, Ventura A, et al. Mechanical properties and microstructure of laser welded Ti-6Al-2Sn-4Zr-2Mo (Ti6242) titanium alloy. Materials Science & Engineering A, 2016, 663: 213-224. DOI:10.1016/j.msea.2016.02.068 (  0) 0) |
| [14] |
ASTM E112-13. Standard Test Methods for Determining Average Grain Size. West Conshohocken, PA: ASTM International, 2013.
(  0) 0) |
| [15] |
Zhang X G, Li L Q, Chen Y B, et al. Effects of pulse parameters on weld microstructure and mechanical properties of extra pulse current aided laser welded 2219 aluminum alloy joints. Materials, 2017, 10(9): 1091-1106. DOI:10.3390/ma10091091 (  0) 0) |
| [16] |
Janasekaran S, Jamaludin M F, Muhamad M R, et al. Autogenous double-sided T-joint welding on aluminum alloys using low power fiber lase. International Journal of Advanced Manufacturing Technology, 2017, 90: 3497-3505. DOI:10.1007/s00170-016-9677-y (  0) 0) |
| [17] |
Kumar K, Kailas S V. The role of friction stir welding tool on material flow and weld formation. Materials Science and Engineering: A, 2018, 485(2): 367-374. DOI:10.1016/j.msea.2007.08.013 (  0) 0) |
| [18] |
Chen Z X, Peng C T, Liu Q, et al. A new quaternary phase observed in a laser treated Zn-Al-Mg-Si coating. Journal of Alloys and Compounds, 2014, 589: 226-229. DOI:10.1016/j.jallcom.2013.11.216 (  0) 0) |
| [19] |
Sathiya P, Mishra M, Shanmugarajan B. Effect of shielding gases on microstructure and mechanical properties of super austenitic stainless steel by hybrid welding. Materials and Design, 2012, 33: 203-212. DOI:10.1016/j.matdes.2011.06.065 (  0) 0) |
| [20] |
Sathiya P, Mishra M, Shanmugarajan B. Effect of shielding gases on microstructure and mechanical properties of super austenitic stainless steel by hybrid welding. Materials and Design, 2012, 33(1): 203-212. DOI:10.1016/j.matdes.2011.06.065 (  0) 0) |
| [21] |
Nie F H, Dong H G, Chen S, et al. Microstructure and mechanical properties of pulse MIG welded 6061/A356 aluminum alloy dissimilar butt joints. Journal of Materials Science & Technology, 2018, 34(3): 551-560. DOI:10.1016/j.jmst.2016.11.004 (  0) 0) |
| [22] |
Meena S L, Butola R, Murtaza Q, et al. Metallurgical investigations of microstructure and microhardness across the various zones in synergic MIG welding of stainless steel. Materials Today: Proceedings, 2017, 4(8): 8240-8249. DOI:10.1016/j.matpr.2017.07.166 (  0) 0) |
 2021, Vol. 28


