2. Department of Material Engineering, College of Engineering, University of Diyala, Baqubah 32001, Diyala, Iraq
Although the rolling operation is a traditional technique used to reduce plate thickness, it greatly impacts metal forming that is employed for engineering purposes. Aluminum alloys are utilized in different engineering applications such as structural and industrial parts [1-2]. The rolled Al2024 alloy is commonly applied for the manufacturing of aerospace parts like wing and fuselage structures due to its high strength and excellent fatigue compared to its weight. Measurement of surface integrity in terms of surface roughness, surface hardness, and surface residual stresses consider significant requirements for the best quality of the rolled product due to their determination of the synchronous defects through the rolling operation. The material is subjected to high plastic deformation because of the reduction in the workpiece thickness by the roll compression effect which increases the possibility of defects taking place. Oxides scale on the metal surfaces is one of these defects and it is created due to the reaction that occurs between the iron with its accompanying elements and oxygen produced by the atmospheric environment. The layers of oxide scale are accumulated including iron and other alloy elements. The surface integrity evolution induced by mechanical surface treatments considers an important task that should be taken into consideration[3-6]. One of the important criteria for demonstrating the quality of rolled products is to conduct experimental tests with different rolling parameters. Recently, different researchers have investigated the selection of the appropriate rolling parameters to obtain the surface integrity for the best quality of the rolled parts. In rolling operation, friction represents the force that tries to resist the motion of the workpiece through the rolling. The coefficient of friction is the ratio of the force produced by friction to the total mass of the body. When the rolls move on the workpiece surface with a compression effect, the workpiece is deformed at point contact and continues with the moving of rolls.Lenard[7] made a study to predict the impact of the roughness of roll on factors of rolled Al 6061-T6 strip through the forming process based on both force and torque of roll. This study concluded that the coefficient of friction coefficient is the most important factor effect on surface roughness. Wei et al.[8] showed the oxide scale impact on the surface roughness and friction coefficient during the hot rolling operation of the stainless steel strip. Sun et al.[9] performed a rolling technique to form aluminum alloy using two high rolling mills and then determined the optimum surface roughness value. They concluded that roller reduction (thickness reduction) and lubrication viscosity play a major role in demonstrating surface quality. Stainless steel plates in terms of austenitic and martensitic types were adopted during the hot rolling process to show surface roughness. This study revealed that the oxide scale which occurs through reheating has a high impact on the friction factor and surface roughness[10]. Rui et al.[11] utilized a finite element approach to model the rolling operation and they proved that both the work roll and force of roll had the most significant effect on the surface roughness of the rolled steel strip. Qian et al.[12] applied the mill rolling procedure during the double cold forming procedure to analyze the roll surface oil film thickness at different rolling speeds. The surface roughness of the roller, max stress generated by contact rolls, initial dynamic viscosity, and pressure viscosity coefficient for the emulsion. Xu et al.[13] selected steel alloy type GCr15 as a rolled material fabricated by ultrasonic rolling technique to predict the surface integrity in terms of surface roughness and surface residual stresses. HSLA steel strip was considered as a formed material under cold rolling and annealing conditions to show the mechanical properties under different process parameters[14]. Nwachukwu and Oluwole made work to check the mechanical features of St60Mn steel parts obtained by hot rolling practices with several parameters involving strain rate, total deformations, and final forming temperature[15]. In another study, a multi-pass hot rolling operation of austenitic stainless steel alloy with continuing nitrogen was conducted by Ref.[16]. The obtained microstructure and mechanical features during high rolling temperature conditions (700-1000 ℃) were investigated and it showed that this condition can give fine fully recrystallized grains. Li et al.[17] achieved a cold rolling test to reduce the thickness reduction of AISI 304N from 5% to 90%. This study identified both the microstructure and mechanical features. Long et al.[18] conducted cold rolling deformation and dual-phase treatment to increase the strength of low carbon steel bars with good ductility while Liu et al.[19] adopted warm rolling and annealing techniques to determine the microstructure and mechanical properties of medium carbon steel. Nordala et al.[20] investigated the effect of the cold rolling reduction from 25% to 75% on the microstructure and mechanical behavior after several annealing procedures for plain low carbon steel. They revealed that the increase in reduction of thickness leads to a rise in strength with reducing in elongation. Zircaloy-4 material was considered in the cold rolling technique that was performed under different reduction ratios to find hardness, fracture surface, and microstructure[21]. Abdelrahim et al.[22] adopted a warm rolling operation with multiple stages and at various thickness reductions of 30%, 50%, and 70% to evaluate the microstructure and mechanical properties of the 304 stainless steel.
Residual stress considers an important factor effect on the quality and surface integrity of the rolled products. These stresses generate inside and on the surface of the material because of the high plastic deformations that were created during the forming operation. Wang et al.[23] used a finite element procedure to evaluate the obtained residual stresses in steel strips during the hot rolling process. The generated longitudinal residual stresses during cold rolling of GH4169 were predicated by employing the finite element method at various rolling factors. This study revealed that the velocity from 0.07 to 0.14 m/s can reduce longitudinal residual stresses while both the thickness reduction and friction coefficient had an important effect on the longitudinal residual stresses[24]. Ding et al.[25] made a steel model of a spline tooth produced by the cold rolling technique and studied the distribution of surface residual stresses on it. Witek and Milenin[26] applied a numerical approach to analyze the temperature and residual stresses of steel strips produced by a hot rolling operation. They concluded that the level of residual stress is influenced by the end of phase transformations at the end state in the strip coil. Aerospace ring type 2219 aluminum was considered to study the generated residual stresses through the rolling procedure based on the stress relief technique[27]. Han et al.[28] applied both 2D and 3D finite element analysis to simulate residual stress profiles that appear after the deep rolling process of the Ti-6Al-4V alloy. In their study, various rolling parameters were considered such as friction coefficient, rolling speed, and the number of passes. They recorded that the coefficient of friction slightly impacts the residual stresses in the hoop direction while the rise in rolling speed led to a decrease in hoop residual stresses. Prabhu et al.[29] performed a deep rolling test of AISI 4140 steel alloy using various forming parameters such as the force of rolling and diameter of the ball to predict the residual stresses. This study concluded that there are important compressive residual stresses at the rolling force of 750 N up to a depth of 300 micrometers under the surface. Zheng et al. used aluminum alloy grade 7050 to examine surface integrity using an experimental procedure based on ultrasonic surface rolling in two dimensions. The analysis of the model was run by the regression technique to determine roughness and residual stresses for the surface as well as microhardness, and close degree. This work revealed that both the static load and feed rate affect surface integrity[30].
According to the previous articles shown above, the optimization of the rolling parameters for enhancing the surface integrity of the rolled plate is imperious. On the other hand, the prediction of the combined effect of thermal and mechanical factors on surface quality behavior is very complicated and requires increasing the number of rolling experiments. Based on that, the present research adopted Taguchi technique L27 for the rolling process of Al2024 alloy with three various parameters representing a reduction of plate thickness, forming temperature, and type of lubrication that is used to reduce the friction between rolls and plate surfaces. Then, surface roughness, surface hardness, and surface residual stresses in the longitudinal direction are measured to obtain the best integrity of the rolled surface.
1 Material Properties and Rolling OperationHSS tool steel is applied as a material for rolls while Al2024 alloy represents the plate material for utilization in the rolling experiments. Table 1 reports the chemical composition for the Al2024 obtained by a spectral test using Mobile Metal Analyzer Spectro Port/PXC01. Table 2 displays the values of material characteristics of as received material (Al2024 alloy) obtained by experimental tests including tensile, hardness, and roughness. The material (aluminum plate) is prepared by cleaning the surface without using polishing and heat treatment processes.
| Table 1 Chemical composition of Al2024 alloy |
| Table 2 Material features of Al2024 alloy |
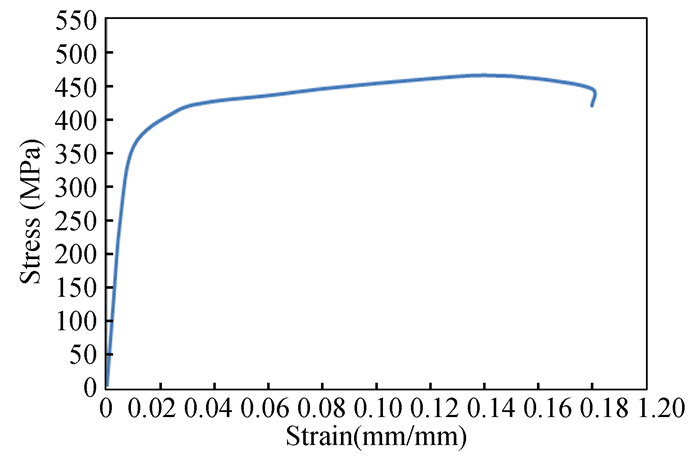
Fig. 1 demonstrates engineering stress vs engineering strain done by a tensile test at room temperature with sample dimensions based on ASTM A370 standards and a velocity of 20 mm/min using a computer tester WDW-200E that has a capacity of 20 tons. In order to obtain a high accuracy of the stress and strain values, the test was re-examined three times and the average of these values was considered.
|
Fig.1 Engineering stress vs. strain plot of Al2024 alloy |
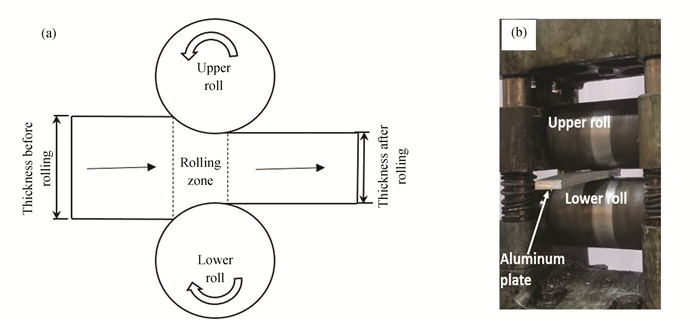
The rolling operation was conducted based on two identical rolls using a laboratory rolling device at a velocity of 3 m/min. The roll diameter and width were 55 and 100 mm respectively. The dimensions of the initial aluminum plate were 100 mm in length, 23 mm in width, and 6 mm in thickness. The plate thickness was reduced to 5.7 mm at R=5%, 5.4 mm at R= 10%, and 5.1 mm at R=15%. During the experimental procedure, oil-in-water (o/w) emulation with 5% v/v concentration based on three types of properties was applied as a lubricant to decrease the friction between the aluminum plate surface and the roll surface. Table 3 presents important chemical and physical features of three oil types that were used as lubrication for the rolling setup.
| Table 3 Important chemical and physical features of three oil types |
Before each rolling experiment, both the roll and aluminum plate surfaces were cleaned using acetone, and lubrication was placed on each side of the plate using a soft brush. After completing the rolling operation, the final thickness and length were measured. To perform the hot rolling process at 100 and 200 ℃, the aluminum plates were placed in a laboratory furnace for 15 min. Fig. 2 illustrates the schematic drawing and experimental procedure of the rolling operation.
|
Fig.2 Rolling operation (a) schematic drawing and (b) experimental procedure |
2 Taguchi Technique of Rolling Parameters
Three different parameters of the rolling operation are applied in the design of the experiment using the Taguchi technique to determine the optimization for enhancing the surface integrity. Taguchi technique considers one of the most active methods applied to evaluate major effects of the parameters based on minimum runs for the experimental procedure. For the three parameters, Taguchi's L27 is an appropriate orthogonal array to show the real impacts of the rolling parameters with three levels. The used parameters are reduction of plate thickness (R%), forming temperature (T) measured in ℃, and lubrication density (ρ) with unit g/mL. The experimental procedure is performed by employing Taguchi's L27 orthogonal array, and the S/N ratio with ANOVA is adopted to analyze the output of experimental tests. Table 4 introduces coded magnitudes of the three levels and actual magnitudes of chosen parameters for each experiment of rolling operation.
| Table 4 Taguchi's L27 orthogonal array based on coded and actual magnitudes |
Two quality distinctive is utilized for calculating the S/N ratio in this research: minimum-better (MB)min and maximum-better (MB)max. The (MB)min quality features are proper for both the surface roughness (Ra) and surface residual stresses (RS) while the (MB)max is the appropriate selection for the surface hardness (HV). Eqs. (1) and (2) are applied to compute the S/N ratio for the selected parameters[31].
| $ \frac{\mathrm{S}}{\mathrm{N}}=-10 \log \frac{1}{m} \sum\limits_{i=1}^m y_i^2 $ | (1) |
| $ \frac{\mathrm{S}}{\mathrm{N}}=-10 \log \frac{1}{m} \sum\limits_{i=1}^m \frac{1}{y_i^2} $ | (2) |
Based on Eq.(1) and Eq.(2), m is the experiment number, y represents the magnitude of the results response, and i refers to the ith run.
3 Experimental Procedure for Measurement TestsAfter conducting the rolling operation of Al2024 plate based on the design of the experiment (Taguchi technique L27), three measurements have been achieved to evaluate the surface roughness, surface hardness, and surface residual stresses which indicate the essential features of the surface integrity for the rolled product. In turn, the optimum surface quality represents the efficiency of the rolling technique.
Surface roughness was measured for the Al2024 plate before and after the rolling operation using the MarSurf PS1 device. The rolled samples were cleaned and oil and dust were carefully removed to obtain high accuracy for results. The surface roughness of the Al2024 plate before the rolling operation was found to be Ra = 0.65 μm.
The surface hardness is one of the most important mechanical features impacting the tribological material by means of its engineering performance. The microhardness test based on Vickers micro-hardness type using a digital tester device (model TH715) was done to determine the effect of different parameters rolling. In this test, the rolled sample was cleaned and polished to obtain accurate results, then the sample was placed on the lens, and the table vertically was moved in the lens direction, see Fig. 3.

|
Fig.3 Microhardness hardness test |
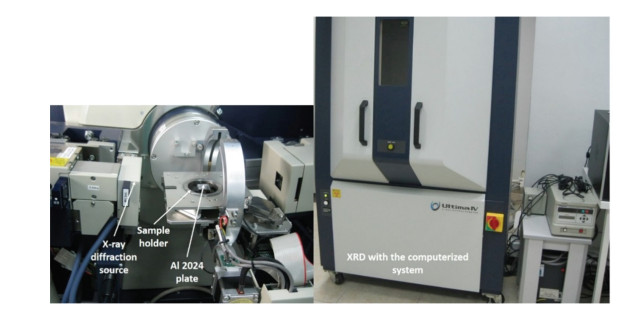
The X-ray diffraction (XRD) method using a multipurpose XRD system (Ultima IV) was adopted to measure surface residual stresses in the longitudinal direction of the Al2024 plate that was produced by the rolling operation as shown in Fig. 4. In XRD, the principle of the variation for the spacing in stressed and unstressed cases is the ratio to the amount of residual stress. The sample was cut with rectangular dimensions 23 mm×23 mm, then the surface was carefully scoured using ethanol. In this test, the irradiated zone was 4 to 6 mm2 for the measurement. The diffraction peak of 10-4 X-rays was calculated to find the precision intensity of 1% at a point and neglecting the time required for measurement. For the diffraction peak, the time of all measurements was taken as constant magnitude around 25 s, and the measured strains were determined utilizing copper target (CuKα). Eq.(4) represents the formula of the strain that can be measured by XRD.
| $ \varepsilon_{\phi \varphi}=\frac{\Delta D}{D_o}=\frac{D_{\phi \varphi}-D_o}{D_o} $ | (3) |
|
Fig.4 XRD of residual stress measurement of Al2024 plate rolled |
where εøφ is the measured strain, Do is the spacing of lattice without stress, and Døφ represents the spacing between lattice planes in ø and φ direction. When ø=0, εøφ can be determined by Eq.(4)[32-33]. ε11 and ε33 represent the strains in parallel and out of the plane perpendicular respectively.
| $ \varepsilon_{\phi \varphi}=\left(\varepsilon_{11}-\varepsilon_{33}\right) \sin ^2 \varphi+\varepsilon_{33} $ | (4) |
The angle of high diffraction (peak angle) is 2θ representing the angle between the stressed plate surface and beam for X-ray for the two orientations while φ (tilt angle) is the angle between the plate surface and normal to the lattice plane. In this study, the tilt angle was considered -45°, 34.5°, -31°, -22°, and 0° to measure the strain that is used in calculating residual stress based on hook's law, as seen in Eq.(5). E and v are Young's Modules and Poisson's ratio respectively. Fig. 4 displays the measurement of the surface residual stress of the Al2024 plate by XRD.
| $ \sigma_{11}=\frac{E}{1+v}\left(\varepsilon_{11}-\varepsilon_{33}\right) $ | (5) |
Fig. 5(a) and (b) present surface morphologies before and after the rolling operation respectively. It can be seen that the surface after rolling is more homogeneous and flatter than before rolling, as illustrated in Fig. 5(b). The granules elongation occurs due to the reduction in plate thickness. So, it can be distinguished that there is surface roughness and defects, as shown in Fig. 5(a).

|
Fig.5 Surface morphologies (a) before rolling and (b) after rolling |
The obtained data of the output responses i.e. surface roughness (Ra), surface hardness (HV), and surface residual stresses (RS) were reported in Table 5.
| Table 5 Rolling parameters (R%, T, and ρ) with the experimental results for various responses (Ra, HV, and RS) based on Taguchi's L27 |
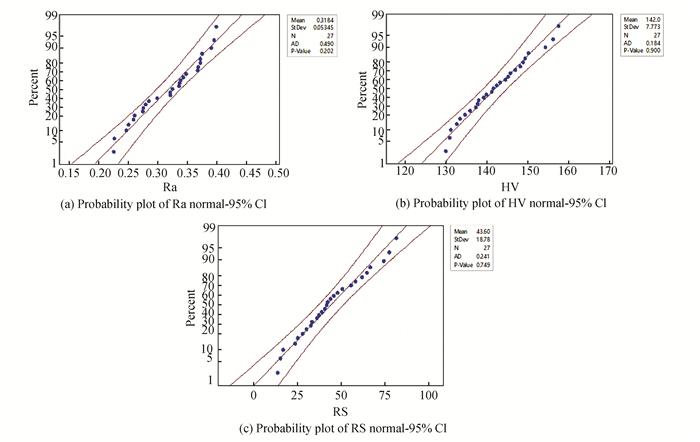
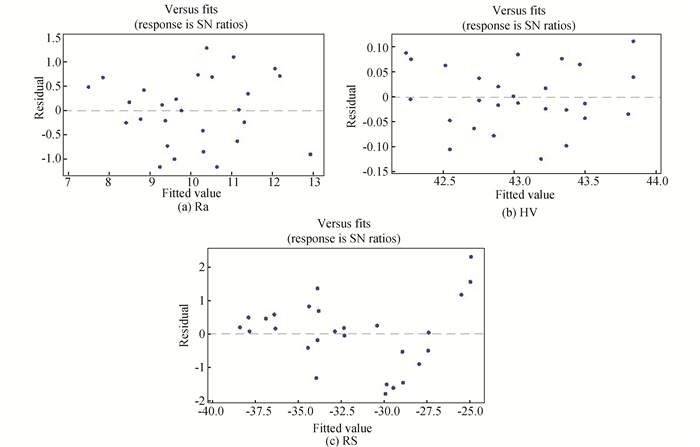
It can be observed from Table 5, the magnitudes of the longitudinal residual stresses at the plate surface in negative sign which means that these stresses are in a compression state. Minitab 17 software was adopted to analyze the obtained data of the responses. Through the plots in Fig. 6 (a)-(c), the normal distribution of data for all output responses were observed and dropped within the confidence level of 95%. In addition, Fig. 7 (a)-(c) displays the appropriate distribution within the limit and fitting of data (Ra, HV, and RS) respectively.
|
Fig.6 Probability plots of output responses (Ra, HV and RS) |
|
Fig.7 Residual vs fits of SN ratio for Ra, HV, and RS data |
4.1 Impact of Rolling Parameters on Surface Roughness (Ra)
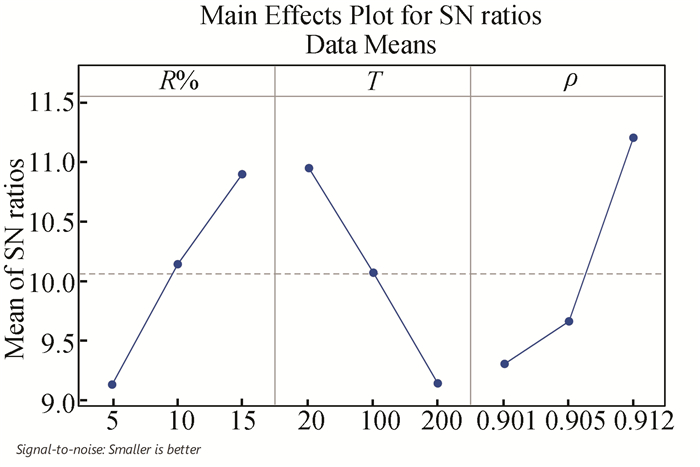
The ANOVA assumption referred to good prediction for the data of the obtained responses. Therefore, the ANOVA results verify whether the design input parameters sufficiently affect the output responses. The important impact of each selected rolling parameter on the Rais shown in Table 6. In ANOVA table, the significance level of the rolling parameters depends on the P value which should equal or less than 0.05. Thus Table 6 reveals that all input parameters have a significant effect on Ra where the P value for each parameter is less than 0.05. Table 7 shows the ranking of the effect of each parameter on the response Ra. So, it indicates that the most important effect on the Ra was the lubrication properties based on density ρ followed by the thickness reduction R% at rank 2 and forming temperature T at rank 3. Fig. 8 demonstrates the optimum combined levels of the input parameters (R%3T1ρ3) that produce the lowest value of the Ra. The increase in lubrication density depending on the mineral oil, the natural fat, and kinematic viscosity as shown in Table 3 and in turn leads to the improvement of the surface quality (decrease Ra) due to the reduction in the friction between the plate and roll surfaces[9-10]. On the other hand, the decrease in surface roughness Ra can be obtained by rising the percentage of thickness reduction R%. Increasing the R% reduces the generated oxide level which then helps to decrease the surface asperities deviations. The ability of the oxide level raises with an increase in R% which leads to a decrease in the breaking of the layers of the oxide level as indicated in previous study[8]. On the opposite side, the relationship between T and Ra can be explained on the basis of the increase in the forming temperature of the metal, which in turn generates thermal plastic deformations and reduces the surface roughness.
| Table 6 ANOVA output for Ra |
| Table 7 Response of signal to noise ratios for Ra |
|
Fig.8 Main impact of S/N ratio plots on Ra |
4.2 Impact of Rolling Parameters on Surface Hardness (HV)
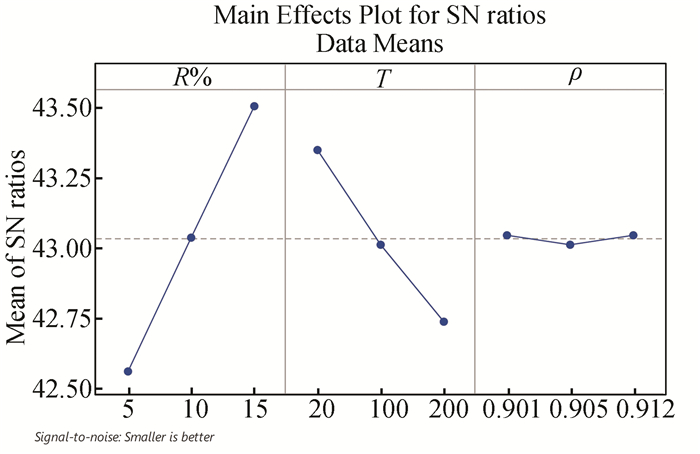
Table 8 introduces ANOVA results of surface hardness response HV. It can be observed that there is a significant effect of both the R% and T on the HV while ρ has an insignificant impact on the HV with P value of more than 0.05 (equal to 0.554). The ANOVA results have been verified by the response of signal to noise ratios of HV (Table 9) where R% has the most important effect (rank 1) followed by T (rank2). Fig. 9 demonstrates the optimum input rolling parameters (R%3T1 ρ1) that produce maximum surface hardness. As known, the HV increases with the augment in the thickness reduction R% due to the grain refinement [17, 21]. In the rolling procedure, the surface hardness can be improved during the grain refinement, strain hardening, and compressive residual stresses[6]. Further, regarding the effect of temperature on the hardness, the creation of the strain hardening through the metal forming at room temperature (T=20 ℃) leads to an increase in HV. On the other hand, the rise of forming temperature is an indicator of increasing the ductility as a result of slow cooling in the air which in turn reduces hardness. As indicated in Fig. 9, there is no important impact on HV by lubrication properties based on density ρ. The lubrication is used to reduce the friction which has little effect on the HV[34].
| Table 8 ANOVA output for HV |
| Table 9 Response of signal to noise ratios for HV |
|
Fig.9 Main impact of S/N ratio plots on HV |
4.3 Impact of Rolling Parameters on Surface Residual Stresses (RS)
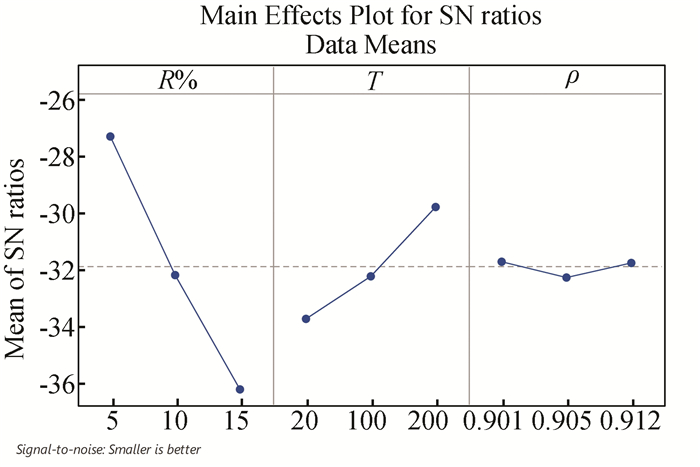
The effect of rolling parameters on the surface residual stress RS and their ranking are presented in Tables 10 and 11 respectively. It can be noticed from the Tables that R% is the most significant impact of the rolling parameters on the RS followed by temperature (T) while ρ has no effect on the RS. As revealed in Fig. 10, the optimum condition of rolling parameters that generate compressive RS is (R%3T1 ρ1). In metal forming operations, the occurrence of plastic deformation through the forming process has a high effect on the increase in the generation of compressive residual stresses [33]. The increase in thickness reduction needs a more rolling force that directly affects the residual stresses. In addition, the RS begins to decrease and then maybe fade as the temperature augments due to the disappearance of the strain hardening (strain hardening occurs at room temperature (cold working) which leads to creating RS). The increase in rolling temperature leads to an augment in the ductility of the material (softer) which leads to a decrease in the rolling force. The compressive residual stresses can be improved due to the effect of the roll compressive on the plate surface through the rolling operation [6]. Although lubrication properties have a significant impact in reducing the heat generation due to the friction in the rolling operation thus obtaining a product with a good surface finish, the lubrication density ρ has little effect on RS as shown in Ref.[33]. Generally, good lubrication can be reduced the friction between rolls and workpiece surfaces, then, the rolling force decrease.
| Table 10 ANOVA output for RS |
| Table 11 Response of signal to noise ratios for RS |
|
Fig.10 Main impact of S/N ratio plots on RS |
4.4 Comparison Between Experimental and Predicted Results
The obtained regression Eqs.(6)-(8) refer to mathematical relations between the rolling parameters and responses (Ra, HV, and RS) respectively. So, the predicted values of the mentioned responses can be obtained by these equations and can be compared with the experimental data. This comparison is shown in Fig. 11 and it indicates the pretty approval between the predicted and experimental data which evidences that the proposed model is coherent and expedient.
| $ \mathrm{Ra}=6.05-0.00610 \;R \%+0.000360 \;T-6.31 \;\rho $ | (6) |
| $ \mathrm{HV}=125.3+1.5467 \;R \%-0.05551 \;T+7.9 \;\rho $ | (7) |
| $ \mathrm{RS}=59+4.093 \;R \%+0.0920 \;T-51 \;\rho $ | (8) |

|
Fig.11 Comparison between experimental and predicted results (a) Ra, (b) HV, and (c) RS |
5 Conclusions
In this research, the surface integrity of Al2024 including surface roughness, surface hardness, and surface residual stresses created by rolling operation was predicted using the Taguchi technique with L27. Three important rolling parameters (thickness reduction, forming temperature, and lubrication properties in terms of density) were taken into consideration as input data in the design of the experiment.
The surface roughness was strongly affected by the lubrication type based on the density. Therefore, there is a big possibility of improving the surface quality (reducing roughness) if the density of lubrication augments according to the mineral oil type, the natural fat, and the kinematic viscosity. A similar improvement of the surface quality has been observed through an increase in the thickness reduction of the aluminum plate while a decrease in the forming temperature led to a decrease in the surface roughness. The optimum rolling parameters to produce the best surface finish are (R%3T1ρ3) i.e. at higher suggested levels of thickness reduction and density along with the lower level of forming temperature.
There was a very important impact on the surface hardness by thickness reduction and forming temperature compared to the lubrication properties which has an insignificant effect on the surface hardness The optimum condition of rolling parameters that generate higher hardness is (R%3T1ρ1). This indicates that a higher level of thickness reduction combined with lower levels of forming temperature and lubrication density provided higher surface hardness.
The surface residual stresses completely changed due to the effect of the reduction in thickness and the forming temperature. The increase in the thickness reduction augments the induced compressive residual stresses while the rise in the forming temperature offers less residual stresses. In the meanwhile, the lubrication density has a slight impact on residual produced stresses. The optimum value of the induced compressive residual stress can be obtained at rolling conditions (R%3T1ρ1) i.e. higher levels of both thickness reduction and lubrication density combined with a lower level of forming temperature (room temperature).
| [1] |
Murugesan M, Sajjad M, Jung D W. Experimental and numerical investigation of cold roll forming process. IOP Conf. Series: Mater. Sci. & Eng., 2020, 758: 012067. DOI:10.1088/1757-899X/758/1/012067 (  0) 0) |
| [2] |
Murugesan M, Sajjad M, Jung D W. Experimental and numerical investigation of AA5052-H32 Al alloy with U-profile in cold roll forming. Mater., 2021, 14(2): 470. DOI:10.3390/ma14020470 (  0) 0) |
| [3] |
Dang J, Zhang H, An Q, et al. On the microstructural evolution pattern of 300 M steel subjected to surface cryogenic grinding treatment. Journal of Manufacturing Processes, 2021, 68(Part A): 169-185. DOI:10.1016/j.jmapro.2021.05.02 (  0) 0) |
| [4] |
Wang D, Dang J, Li Y, et al. Study on the surface integrity distribution of 300 M ultrahigh strength steel subjected to different surface modification treatments. Surface and Coatings Technol., 2022, 451: 129033. DOI:10.1016/j.surfcoat.2022.129033 (  0) 0) |
| [5] |
Dang J, An Q, Lian G, et al. Surface modification and its effect on the tensile and fatigue properties of 300M steel subjected to ultrasonic surface rolling process. Surface and Coatings Technol., 2021, 422: 127566. DOI:10.1016/j.surfcoat.2021.127566 (  0) 0) |
| [6] |
Dang J, Zhang H, An Q, et al. Surface integrity and wear behavior of 300M steel subjected to ultrasonic surface rolling process. Surface and Coatings Technol., 2021, 421: 127380. DOI:10.1016/j.surfcoat.2021.127380 (  0) 0) |
| [7] |
Lenard J G. The effect of roll roughness on the rolling parameters during cold rolling of an aluminum alloy. Journal of Materials Processing Technology, 2004, 152(2): 144-153. DOI:10.1016/j.jmatprotec.2004.03.026 (  0) 0) |
| [8] |
Wei D, Jiang Z, Huang J, et al. Study on surface roughness and friction during hot rolling of stainless steel 301. Advanced Materials Research, 2012, 500: 403-409. DOI:10.4028/www.scientific.net/AMR.500.403 (  0) 0) |
| [9] |
Sun J, Ying H, Lu M. Optimize aluminum's surface roughness in rolling lubrication process. Indus. Lub. Trib., 2013, 65: 175-180. DOI:10.1108/00368791311311178 (  0) 0) |
| [10] |
Jiang Z Y, Wei D B, Cheng X, et al. Surface roughness and friction in hot rolling of stainless steels. Mater. Sci. For., 2014, 783-786: 795-800. DOI:10.4028/www.scientific.net/MSF.783-786.795 (  0) 0) |
| [11] |
Rui LI, Qingdong Z, Xiaofeng Z, et al. Control method for steel strip roughness in two-stand temper mill rolling. Chin. J. Mech. Eng., 2015, 28: 573-579. DOI:10.3901/CJME.2015.0310.027 (  0) 0) |
| [12] |
Qian C, Bai Z, Zhang J, et al. Formation mechanism and influence factors of roll surface oil film thickness in the double cold reduction mill. Math. Prob. Eng., 2020, 2020: Article ID 6746828. DOI:10.1155/2020/6746828 (  0) 0) |
| [13] |
Xu H, Yao G, Wang X, et al. Experimental study of GCr15 steel in ultrasonic rolling process. Aust. J. of Mech. Eng., 2020, 20(2): 387-396. DOI:10.1080/14484846.2020.1714350 (  0) 0) |
| [14] |
Schindler I, Janošec M, Místeck E, et al. Effect of cold rolling and annealing on mechanical properties of HSLA steel. Arch. Mater. Sci. & Eng., 2009, 36: 41-47. (  0) 0) |
| [15] |
Nwachukwu P U, Oluwole O O. Effects of rolling process parameters on the mechanical properties of hot-rolled St60Mn steel. Case Stud. Const. Mater., 2017, 6: 134-146. DOI:10.1016/j.cscm.2017.01.006 (  0) 0) |
| [16] |
Krishna S C, Karthick N K, Jha A K, et al. Effect of hot rolling on the microstructure and mechanical properties of nitrogen alloyed austenitic stainless steel. J. Mater. Eng. Perf., 2018, 27: 2388-2393. DOI:10.1007/s11665-018-3317-7 (  0) 0) |
| [17] |
Li X, Wei Y, Wei Z, et al. Effect of Cold Rolling on Microstructure and Mechanical Properties of AISI 304N Stainless Steel. IOP Conf.Series: Earth and Enviro. Sci., 2019, 252(2): 022027. DOI:10.1088/1755-1315/252/2/022027 (  0) 0) |
| [18] |
Long L V, Hien D V, Thanh N T, et al. Impact of cold-rolling and heat treatment on mechanical properties of dual-phase treated low carbon steel. Adcances in Materials Science and Engineering, 2020, 2020: Article ID 1674837. DOI:10.1155/2020/1674837 (  0) 0) |
| [19] |
Liu G, Liu J, Zhang J, et al. Microstructure evolution and mechanical properties of medium carbon martensitic steel during warm rolling and annealing process. Materials, 2021, 14(22): 6900. DOI:10.3390/ma14226900 (  0) 0) |
| [20] |
Nordala P, Othman R, Ismail A B. Effect of rolling reduction on microstructure and mechanical properties of plain low carbon steel. Key Engineering Materials, 2016, 701: 187-194. DOI:10.4028/www.scientific.net/KEM.701.187 (  0) 0) |
| [21] |
Aǧca S, Çankaya G. The effect of cold rolling on mechanical properties of zircaloy-4. International Journal of Multidisciplinary Studies and Innovative Technol., 2017, 1: 29-35. (  0) 0) |
| [22] |
Abdelrahim H, Mohamed H B, La P, et al. Effect of multiple warm rolling on microstructure and mechanical properties of 304 stainless steel prepared by aluminothermic reaction. Advances in Mechanical Engineering, 2020, 12: 1-7. DOI:10.1177/1687814019850998 (  0) 0) |
| [23] |
Wang X, Li F, Yang Q, et al. FEM analysis for residual stress prediction in hot rolled steel strip during the run-out table cooling. Applied Mathematical Modelling, 2013, 37(1-2): 589-609. DOI:10.1016/j.apm.2012.02.042 (  0) 0) |
| [24] |
Ye N Y, Cheng M, Zhang S H. Effect of cold rolling parameters on the longitudinal residual stress distribution of GH4169 alloy sheet. Acta Metallurgica Sinica (English Letters), 2015, 28: 1510-1517. DOI:10.1007/s40195-015-0351-4 (  0) 0) |
| [25] |
Ding Z H, Cui F K, Liu Y B, et al. A model of surface residual stress distribution of cold rolling spline. Mathematical Problems in Engineering, 2017(4): 1-21. DOI:10.1155/2017/2425645 (  0) 0) |
| [26] |
Witek S, Milenin A. Numerical analysis of temperature and residual stresses in hot-rolled steel strip during cooling in coils. Archives of Civil and Mechanical Engineering, 2018, 18(2): 659-668. DOI:10.1016/j.acme.2017.11.002 (  0) 0) |
| [27] |
Wua Q, Wua J, Zhanga Y D, et al. Analysis and Homogenization of Residual Stress in Aerospace Ring Rolling Process of 2219 Aluminum Alloy using Thermal Stress Relief Method. International Journal of Mechanical Sciences, 2019, 157-158: 111-118. DOI:10.1016/j.ijmecsci.2019.04.040 (  0) 0) |
| [28] |
Han K, Zhang D, Yao C, et al. Investigation of residual stress distribution induced during deep rolling of Ti-6Al-4V alloy. Journal of Engineering Manufacture, 2021, 235(1-2): 186-197. DOI:10.1177/0954405420947960 (  0) 0) |
| [29] |
Prabhua P R, Kulkarni S M, Sharma S. Multi-Response optimization of the turn-assisted deep cold rolling process parameters for enhanced surface characteristics and residual stress of AISI 4140 steel shafts. Journal of Materials Research and Technology, 2020, 9(5): 11402-11423. DOI:10.1016/j.jmrt.2020.08.025 (  0) 0) |
| [30] |
Zheng J, Zhu L, Liu H, et al. Overall evaluation of the surface integrity in two-dimensional ultrasonic surface rolling 7050 Al alloy. Journal of the Brazilian Society of Mechanical Sciences and Engineering, 2020, 42: Article number 325. DOI:10.1007/s40430-020-02423-1 (  0) 0) |
| [31] |
Shi K, Zhang D, Ren J. Optimization of process parameters for surface roughness and microhardness in dry milling of magnesium alloy using taguchi with grey relational analysis. The International Journal of Advanced Manufacturing Technology, 2015, 81: 645-651. DOI:10.1007/s00170-015-7218-8 (  0) 0) |
| [32] |
Rangaswamy P, Prime M B, Daymond M, et al. Comparison of residual strains measured by X-ray and neutron diffraction in a titanium (Ti-6Al-4V) matrix composite. Materials Science and Engineering: A, 1999, 259(2): 209-219. DOI:10.1016/S0921-5093(98)00893-4 (  0) 0) |
| [33] |
Gattmah J, Ozturk F, Orhan S. Experimental and finite element analysis of residual stresses in cold tube drawing process with a fixed mandrel for AISI 1010 steel tube. The International Journal of Advanced Manufacturing Technology, 2017, 93: 1229-1241. DOI:10.1007/s00170-017-0583-8 (  0) 0) |
| [34] |
Moore A J W, Tegart W J M. Relation between friction and hardness. Proceeding of the royal society, Mathematical, Physical and Engineering Sciences, 1952, 212: 1111. DOI:10.1098/rspa.1952.0234 (  0) 0) |
 2023, Vol. 30


