2. Collaborative Innovation Center of Advanced Aero-Engine, Beijing 100191, China;
3. Beijing Engineering Technological Research Center of High-Efficient and Green CNC Machining Process and Equipment, Beijing 100191, China
GH4169 is a wrought nickel-based super alloy with excellent ability to resist fatigue and creep behaviors [1]. On the one hand, it is a critical material in the aero-engine machining to withstand high service temperatures and pressures. On the other hand, it is a typical hard machined material that can easily result in damage of surface integrity. Coated carbide tools get widespread use in cutting of GH4169 given their supreme properties as well as relatively low cost [2]. Unfortunately, severe tool wear is unavoidable during machining. Cutting tool wear is dynamic during continuous machining, which results in the differences of surface integrity under different tool wear conditions. Research showed that most of the parts' failure was related to surface integrity [3]. The inconsistence of surface integrity can easily result in the corrosion and crack under complicated working conditions. The dynamic increasing tool wear is a great challenge to surface and subsurface properties [4]. Research suggested that surface roughness, micro-hardness, and grain size changed because of severe tool wear [5].
RS within affected layers have great effects on parts' fatigue strength, and it is an important indicator for evaluating surface properties. Tensile RS promotes the fatigue failure while compressive RS is generally considered to be helpful [6]. Issues of cutting tools have been broadly researched to collect evidences that tool wear indeed influences the RS state. Arunachalam et al. [7] considered that tool materials have an effect on machining RS and this is caused by the heat effect during tool wear. Saoubi et al. [8] summarized how geometry parameters and flank face wear of tools change the RS distribution, they found that flank face wear may not be the main reason that induce RS change. Thakur et al. [9] discovered that uncoated tools cause higher RS than coated tools and this mainly attribute to the tool wear. Saini et al. [10] comprehensively studied issues of surface integrity and tool wear in hard turning with different cutting parameters. Qualitative results revealed the changing of RS and tool wear individually during cutting, and they pointed out the problem that reports on tool wear and RS combination were scanty. Currently, many researchers focused on the interaction between tool wear and RSL. Liang et al. [11] did dry cutting of Ti-6Al-4V and found the compressive RS of machined surface decrease with the tool wear aggravation. However, Wang et al. [12] gave an overview of machined RS of titanium and nickel alloys with the influences of tool wear. The specific conclusion was drawn that RS beneath the machined surface with worn tools became more compressive and the depth went deeper. Yue et al. [13] analyzed the hard turning of Cr12MoV and found out the increase of tool wear may cause the increase of compressive stress area and depth. Sastry et al. [14] studied the boring of AA 7075 alloy under dry, wet and cryogenic conditions respectively. They discovered that it has little tool wear in cryogenic boring and it showed compressive RS in workpiece. These findings allow us to take the next step in establishing a method to reduce tensile RS by controlling tool wear.
Under the effects of complex physical and chemical changes during cutting, DL appear as a result of cutting force and heat, and it is striking on nickel-based super alloys.Ezugwu et al. [15-16] proposed that tool wear is the main reason why DL appear in cutting of Inconel 718 with ceramic tools and PVD & CVD coated tools. To further confirm the rule of tool wear, Che-Haron [17] conducted the work in titanium alloys and revealed that the worn tools indeed thicken the plastic deformation layers. The findings of Sharman et al. [18] provided additional support that the DL thicknesses increase with tool wear when performed a drilling experiment in Inconel 718, and they noticed that it is more distinct in low speed. In addition, Arunachalam et al. [19] suggested a possibility that cutting force is dominant in appearing of DL. This could explain why tool wear and the depth of DL show positive correlation. The contrast experiment of Bushlya et al. [20] between tool wear, cutting fluid and cutting speed further add to the accumulating evidence. Researches on the combination of tool wear and DL are undoubtedly excellent supplement to the reported results of RS.
Synthetic studies of tool wear, RSL, and DL are favorable to realize the consistent surface integrity. Yao et al.[21] did a comparative study of RSL and DL in Aermet100 steel. The experiments suggested the compressive RS matched smaller DL. Xin et al. [22] analyzed the influence of cutting conditions on both RS and DL in milling of titanium alloy. They focused on lattice tensile deformation but did not set up the relation between DL and RSL. Cutting can be limited to appointed tool wear state thus the expected surface can be achieved. Because of the difficult post-processing of aviation cases, there are high requirements for machined surface integrity. It is important to find out mapping relationships among tool wear and affected layers under specific machining conditions.
In this paper, tool wear state is identified by tool nose wear ratio near minor flank face. Then the relationships between cutting time, tool wear states, and conditions of affected layers are built, aiming at keeping consistent machined surface integrity. Thus, the affected layers become controllable by stipulating the range of cutting time and a new evaluation method of tool wear is developed from the angle of workpiece. Failures caused by inconsistent surface conditions can be effectively avoided. What we have done is to gain the information of tool wear conditions, distribution of RS in depth, morphology of DL, and surface roughness variations. By extracting features of tool wear ratio, maximum value of tensile RS, depths of RSL & DL, and surface roughness index of Ra & Rz, we are aiming at unifying the tool wear and machined affected layers. Then the suitable cutting time ranges of a single tool under specific conditions are concluded.
1 Materials and MethodsWorkpieces used in turning experiments are GH4169/Inconel 718 bars with geometric dimensions of ϕ33 mm×110 mm after standard heat treatment (solid solution heat treatment followed by rapid cooling and double aging heat treatment). The chemical composition and mechanical properties under room temperature are presented in Tables 1-2.
| Table 1 Chemical components of GH4169/Inconel 718 |
| Table 2 Mechanical properties of GH4169/Inconel 718 |
Dry cutting experiments are conducted with 6 same coated carbide tools under the parameters of vc= 15 m/min and f=0.05 mm/r and ap=1 mm. The cutting length of 55 mm (equal to cutting time of 7.37 min) is defined as a cutting unit. Tools numbered T1-T6 with increasing cutting unit successively represent 6 different tool wear conditions. The general situation of experiments is shown in Table 3.
| Table 3 General situation of experiments |
The ACGNR2020K12 cutter holder is used in the experiments, which means the Rhombic 80° turning blade is chosen with the flank angle of 0° and cutting-edge angle of 90°. The coating type of tools is TiAlN.
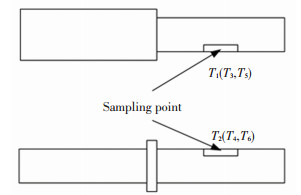
It is assumed that tool wear conditions under given cutting time are uniform, thus differences between two adjacent tools are determined by the last cutting unit merely. Specimens are taken from the last cutting unit of each tool, as shown in Fig. 1, while tool wear conditions are recorded and affected layers are detected.
|
Fig.1 Specimen with sampling points |
The morphologies of tools under different wear states are taken by Dino-Lite AD4113T. It is a digital microscope with a matched software by which the values of VB are measured.
The PRISM system is utilized for RS measurements. Stresses within 2 mm depth can be precisely measured with an error less than 7 MPa. 15 measurement points in each sample are taken at the depths of 0.02, 0.04, 0.06, 0.08, 0.10, 0.12, 0.14, 0.16, 0.18, 0.20, 0.25, 0.30, 0.35, 0.40, and 0.50 mm respectively. Table 4 lists the parameters used in residual stress measurement.
| Table 4 Paraments in residual stresses measurements |
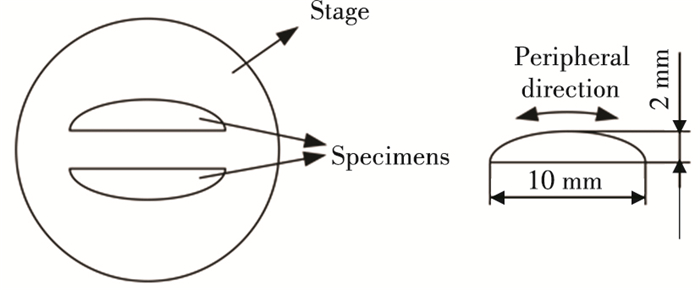
The microstructure of DL is photographed by OLYMPUS OLS4100, a 3D measuring laser scanning confocal microscope. Specimens need to be ground, polished and etched in advance, as shown in Fig. 2.
|
Fig.2 Specimens in DL tests |
The TIME 3220 mobile roughness measuring instrument is utilized for surface roughness measurements of workpieces machined by 6 tools with different cutting time.
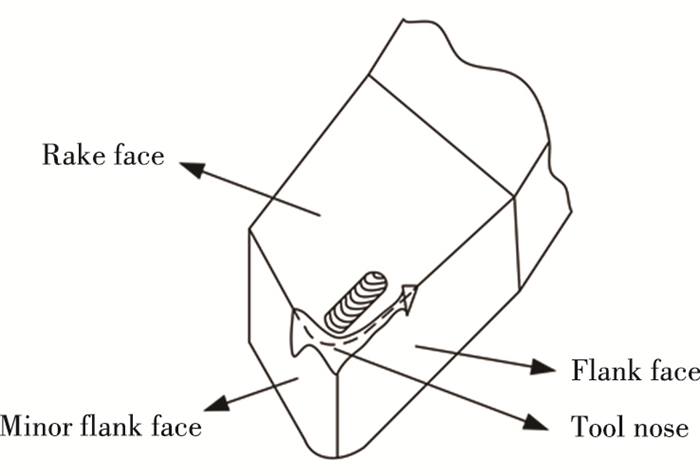
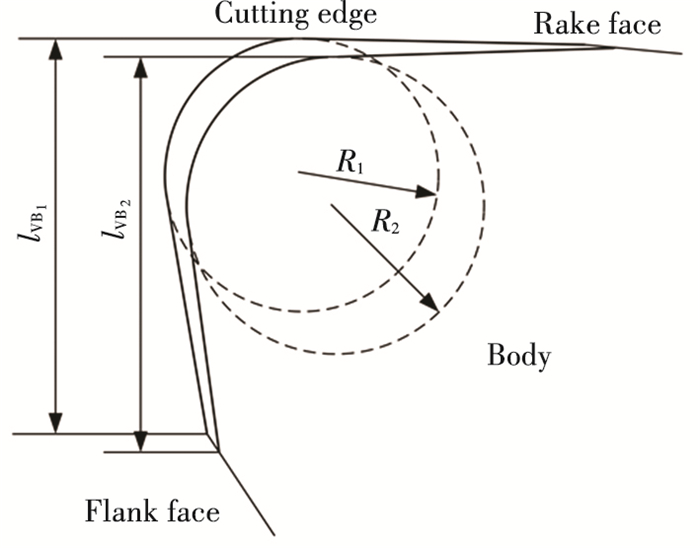
2 Results and Discussion 2.1 Situations of Tool WearDue to the wear behaviour in machining, as shown in Fig. 3, the geometric parameters of tools change dynamically. Fig. 4 shows that the value of VB in traditional cutting theories cannot precisely describe tool wear state. Although values of lVB1 and lVB2 differ a little, the radius of cutting edges (R1 and R2) show a great distinction due to rake face and flank face wear. Cutting action makes a difference so the description of tool wear should be defined from multiple perspectives.
|
Fig.3 Tool wear in machining process |
|
Fig.4 Cutting edge wear in machining process |
Typical images of flank face (left) and rake face (right) with values of VB are presented in Fig. 5. Tool wear goes into the stable stage rapidly at the cutting time of about 7 min. The initial tool wear stage is much shorter than the stable stage for coated tools, more attention should be paid to the characterisation of machined surface got under stable tool wear stage. Due to the relatively long cutting time unit in the experiments, the initial tool wear stage is deliberately avoided. The characteristics are distinct that the part of tool nose near minor flank face wears more severely than that near flank face. The tool wear rate (volume loss in unit volume per unit of time) can be calculated as follows:
| $ \dot{\omega }=K{{\text{e}}^{\left( -\frac{\alpha }{T+273.15} \right)}}V $ | (1) |

|
Fig.5 Wear situations of 6 tools with different cutting time |
where
In machining of hard machined materials, cooling conditions in the areas of tool nose is poor and stress concentration is serious. Tool wear rate is only relevant to cutting temperature in allusion to a specific workpiece under constant cutting speed. With given cutting time interval, wear rate is in proportion to wear ratio (the proportion of tool wear to the original tool nose). The variation of wear ratio is used here to represent the cutting heat effect. Based on the photos of tool wear morphology under different cutting time, the numbers of pixels of each tool are calculated and compared with that of a new cutting tool, thus the wear ratio of 6 tools can be calculated, as shown in Table 5. Tool wear here is divided into 5 states without separate consideration of the initial tool wear stage, for S1: 0-15 min (before T2); S2: 15-22 min (T3); S3: 22-30 min (T4); S4: 30-37 min (T5); S5: over 37 min (after T6).
| Table 5 Wear ratio of tool nose |
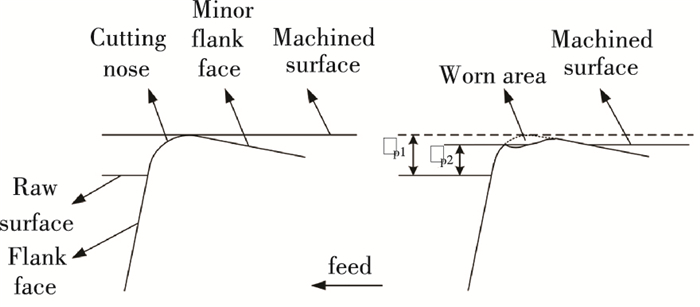
During the formation of machined surfaces, minor flank face interacts with workpiece directly and tool nose wear of this area plays a pivotal role in surface quality. Consequently, cutting position of tool nose skews, cutting depth decreases and contact condition between machined surface and minor flank face changes, as shown in Fig. 6.
|
Fig.6 Tool nose wear in machining process |
The middle point of the tool nose is set to demarcate cutting position. With the uneven wear and breakage of tool nose, the corner radius diminishes and the cutting position of tool nose skews towards the raw surface of workpieces. The morphology of minor flank face changes during cutting and tool nose in this area gradually loses cutting capacity. The extrusion between cutting tools and workpieces introduces the plastic deformation on machined surfaces and the material spring back after cutting tool passes.
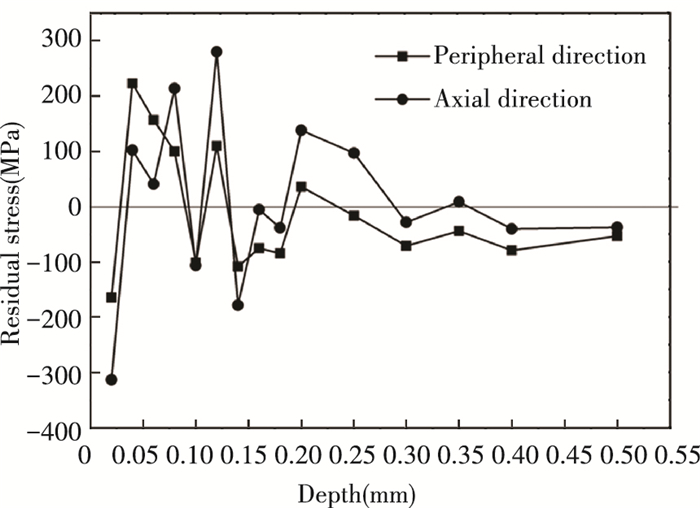
2.2 Residual Stresses TestsThe original RS is measured before machining to ensure that it does not affect the experiments. The results are shown in Fig. 7.
|
Fig.7 Original residual stress before cutting experiments |
The original RSL is about 0.25 mm. When it goes deeper, the value stabilizes at about -80 MPa and it is considered as the reference value. Under the parameter of ap=1 mm, errors caused by original residual stress can be ignored. RS induced by 6 cutting tools are shown in Fig. 8.

|
Fig.8 Residual stresses caused by 6 tools with different cutting time |
RS is a complicated tensile-compressive coupled state. The shape of variation trend looks like a spoon, for there is tensile RS on the superficial layer of the surface and it turns to compressive RS gradually with the increase of depth. Finally the stress fluctuates with the reference value. RS here is a comprehensive result of thermal and mechanical effects. Material on the surface of workpiece swell with cutting heat and the cooling is hindered by inner material thus a tendency of tension appears. Mechanical effects such as extraction and friction induce the plastic deformation and elastic recovery of inner material makes the tendency of compression. Heat heaps rapidly on surfaces in the high-speed cutting and shows a descending distribution in-depth. It appears as tensile RS first on the outer layer and turns to compressive RS. When it goes out of the affected layer, the material inside is not affected by cutting anymore.
The focus is on the comparison between RS in peripheral and axial directions under the same wear state. Obviously, the peripheral RS is higher in TSL while it is significantly lower in the compressive stress layer. It means the material has a trend to be compressed in the axial direction and it is in tension in the peripheral direction. With the rotate of workpieces, cutting tools remove the material in the peripheral direction and heat generates in an instant promising a trend of tensile RS. When cutting tools feed in the axial direction, workpieces are more likely to be extruded so the trend of compressive is more explicit.
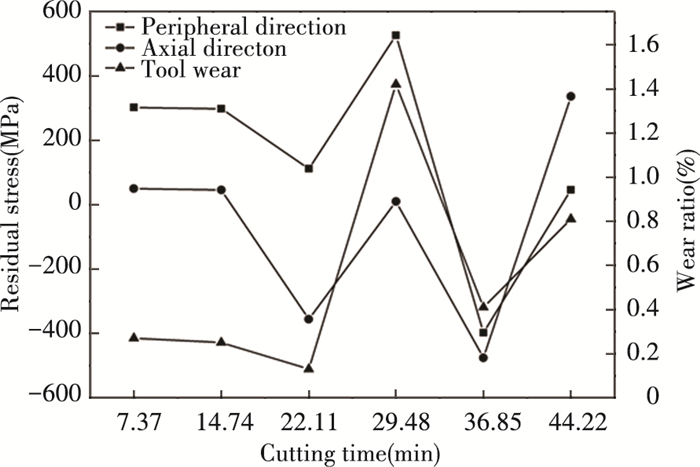
Tensile RS on the surface should be eliminated to reduce the risk of fatigue failure. The maximum value is an important indicator evaluating the condition of RS. According to the "spoon" distribution found above, relationships between tool nose wear ratio and the maximum value of tensile RS are investigated, as shown in Fig. 9.
|
Fig.9 Relationships between wear ratio and tensile residual stresses |
As is mentioned above, it appears as tensile RS when thermal effect dominates. The changing of the maximum values in axial and peripheral directions accord well with wear ratio under different tool wear states. In the primary stage (S1), that cutting tools wear fast with strong thermal effect result in a high level of tensile RS on the surface. Tool wear slows down in stable stage (S2-S4) for tensile RS decrease with cutting. However, RS and wear ratio increase sharply on T4 due to the slight tool nose breakage. In drastic stage (S5), cutting tools wear severely and wear ratio suddenly increases, tool nose breaks seriously with remarkable thermal effects and tensile RS increases abnormally. The integrated machined surface formed with continuous cutting, where the tensile RS fluctuates will be great hidden trouble of fatigue failure in days to come.
In the primary stage, tool wear appears mainly in rake face and flank face rather than tool nose, cutting heat transfers through chips thus residual stress decreases in general. The increase of tool wear results in the improvement of squeezing action and the heat transferred by tools increases due to the contact area getting larger so tensile RS decline to a low level. The outliers appear on T4 and T6 where breakages of tool nose lead to abrupt accumulation of heat on the surface of workpieces. This is caused by an instant decrease in the contact area between cutting tools and workpieces. The "time-stress" relationship listed in Table 6 between the range of cutting time and RS is of great significance to guide the machining and it can be used as a new evaluation standard of tool wear.
| Table 6 Cutting time range and residual stresses |
2.3 Deformation Layer Tests
Essentially, cutting is a complicated process of elastic, plastic and fracture deformations. When machining stresses exceed the yield point of workpiece material, DL appears with the plastic flow of material. Tool wear induces the change of actual cutting conditions, consequently the depths of DL make a difference, as a result of microhardness, stress-strain state and heat distribution change. DL is divided into scale region and stretched grain region. The photographs of DL in 6 conditions are shown in Fig. 10.

|
Fig.10 Micrographs of deformation layers caused by 6 tools with different cutting time |
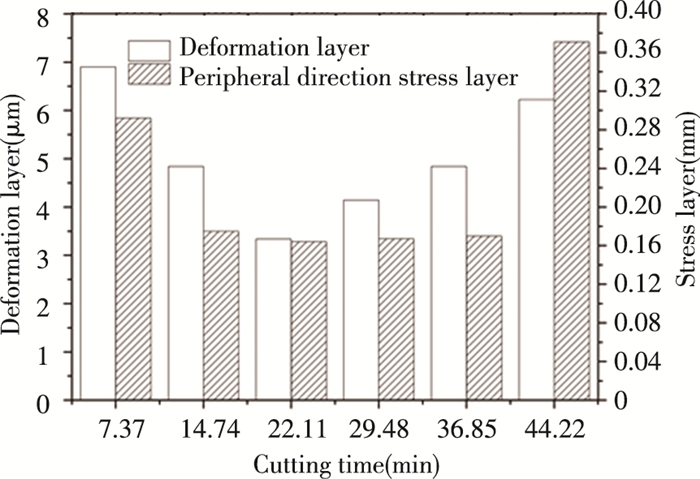
The elongation and deformation in peripheral direction due to the friction and extrusion between machined surface and minor flank face can be seen clearly. The depths of deformation layers range from 3 μ m to 7 μ m, in which it shows tensile RS state, and this coincides well with the deformation direction of grains. The RSL and DL result in different mechanical properties. The parts will be in an unstable state during work time due to the varieties of affected layer thicknesses. If the thicknesses of RSL and DL show similar changing with tool wear, control of uniform affected layers will be easy to realize. Comparison is shown in Fig. 11.
|
Fig.11 Relationships between depths of deformation layers and RSL |
Affected layer depth is defined as the depth on workpieces surface where the cutting process can affect. Results show that the DL and RSL thicknesses in peripheral direction keep the same pace and appear as a U-pattern variation. If the value of 5 μ m is set as a superior depth of DL, cutting effect from S2 to S4 of a single tool should be qualified. Results can be used to predict the other two elements given one of the three conditions including tool wear state, RSL depth, and DL depth.
Thicknesses of affected layers are at low levels at the cutting time range from 15 min to 37 min. Combined with the "time-stress" relationship mentioned above, cutting time range from 15 min to 22 min and that from 30 min to 37 min of a single tool can be used to achieve consistent surface integrity in machining of critical parts.
2.4 Surface Roughness TestsSurface roughness is an essential evaluation index of cutting surface quality. It is greatly influenced by the states of cutting tools. Materials of machined surface in turning actually exist in the form of thread due to the cutting tool geometry. Therefore, machined surface roughness change with the tool wear states.
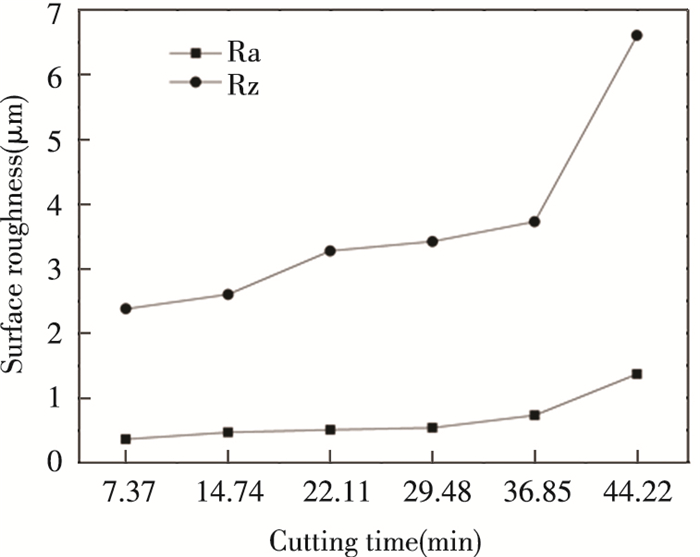
In fact, roughness values increase with the elevated tool wear.The arithmetical mean deviation of the profile (Ra) and microcosmic unflatness (Rz) of surface roughness are taken to evaluate the workpieces machined by 6 tools with different cutting time, as shown in Fig. 12. The values of Ra show flat growth trend before cutting time of 30 min, with the values increasing from Ra0.35 μ m to Ra0.55 μ m. However, surface roughness raised sharply after 30 min. The value of Ra on T5 is twice as much as it was on T1, and much more serious, it increases to more than three times on T6 with the value of Ra1.38 μ m. The values of Rz change significantly and show distinct differences with tool wear, and it can be divided into 3 parts. It shows a good roughness state on T1 and T2, while it increases evidently on T3. Though the cutting tool wears badly from T3 to T5, the values of Rz change a little. After the cutting time of 37 min, the values of Rz increase sharply, which means the flatness of machined surface deteriorates badly, the cutting tool is not suitable for machining any more.
|
Fig.12 Roughness values of the workpiece with different cutting time |
3 Conclusions
In this paper, turning experiments to GH4169 bars are conducted at the parameters of vc=15 m/min and f=0.05 mm/r and ap=1 mm with 6 coated cemented carbide tools. It is followed by tests of tool wear states, residual stresses distributions, deformation layer conditions, and surface roughness variations. Afterwards, comparative analysis is done and it concludes as follows:
1) Tool wear in turning of GH4169 with coated carbide tool at specific parameters can be divided into 5 states by cutting time, including S1: 0-15 min; S2: 15-22 min; S3: 22-30 min; S4: 30-37 min; S5: over 37 min. There is a slight breakage of tool nose at about 30 min and it breaks badly at about 44 min respectively hereto the cutting tool is not suitable for cutting anymore. The total cutting time of a tool should be controlled within 37 min.
2) Conditions of affected layer are mainly affected by tool nose wear that is close to minor flank face rather than flank face wear. The position of tool nose skews, the cutting depth decreases and the contact area between cutting tool and machined surface changes during cutting.
3) A "time-stress" relationship between cutting time range and tensile residual stresses level is obtained. The proposed tool wear state corresponds to a residual stresses level respectively: 0-15 min, 450 MPa in peripheral direction and 330 MPa in axial direction; 15-22 min, 360 MPa in peripheral direction and 120 MPa in axial direction; 22-30 min, 560 MPa in peripheral direction and 300 MPa in axial direction; 30-37 min, 100 MPa in peripheral direction and 60 MPa in axial direction; over 37 min, 320 MPa in peripheral direction and 470 MPa in axial direction. Tensile residual stresses below 400 MPa can be set as a reference for evaluation of tool quality from angle of workpieces.
4) A consistently affected layer of high quality can be got in 15-22 min and 30-37 min, when the tools can be used in the machining of critical parts and regions. The machined surface roughness increases sharply after 37 min and the tool should not be used any more. Based on the tool wear states and affected layer conditions, machining sequence can be better arranged.
| [1] |
Li H, Niu S, Zhang Q, et al. Investigation of material removal in innerjet electrochemical grinding of GH4169 alloy. Scientific Reports, 2017, 7(1): 3482. DOI:10.1038/s41598-017-03770-1 (  0) 0) |
| [2] |
Sun J, Liao X, Yang S, et al. Study on predictive modeling for thermal wear of uncoated carbide tool during machining of Ti-6Al-4V. Ceramics International, 2019, 45(12): 15262-15271. DOI:10.1016/j.ceramint.2019.05.016 (  0) 0) |
| [3] |
Lim H J, Sohn H, Kim Y. Data-driven fatigue crack quantification and prognosis using nonlinear ultrasonic modulation. Mechanical Systems and Signal Processing, 2018, 109: 185-195. DOI:10.1016/j.ymssp.2018.03.003 (  0) 0) |
| [4] |
Meyer R, Köhler J, Denkena B. Influence of the tool corner radius on the tool wear and process forces during hard turning. International Journal of Advanced Manufacturing Technology, 2011, 58(9-12): 933-940. DOI:10.1007/s00170-011-3451-y (  0) 0) |
| [5] |
Umbrello D. Investigation of surface integrity in dry machining of Inconel 718. International Journal of Advanced Manufacturing Technology, 2013, 69(9-12): 2183-2190. DOI:10.1007/s00170-013-5198-0 (  0) 0) |
| [6] |
Li H Y, Sun H L, Bowen P, et al. Effects of compressive residual stress on short fatigue crack growth in a nickel-based superalloy. International Journal of Fatigue, 2018, 108: 53-61. DOI:10.1016/j.ijfatigue.2017.11.010 (  0) 0) |
| [7] |
Arunachalam R M, Mannan M A, Spowage A C. Residual stress and surface roughness when facing age hardened Inconel 718 with CBN and ceramic cutting tools. International Journal of Machine Tools and Manufacture, 2004, 44(9): 879-887. DOI:10.1016/j.ijmachtools.2004.02.016 (  0) 0) |
| [8] |
Saoubi R, Outeiro J C, Chandrasekaran H, et al. A review of surface integrity in machining and its impact on functional performance and life of machined products. International Journal of Sustainable Manufacturing, 2008, 1: 203-233. DOI:10.1504/IJSM.2008.019234 (  0) 0) |
| [9] |
Thakur D G, Ramamoorthy B, Vijayaraghavan L. Effect of cutting parameters on the degree of work hardening and tool life during high-speed machining of Inconel 718. International Journal of Advanced Manufacturing Technology, 2011, 59(5-8): 483-489. DOI:10.1007/s00170-011-3529-6 (  0) 0) |
| [10] |
Saini S, Ahuja I S, Sharma V S. Residual stresses, surface roughness, and tool wear in hard turning: a comprehensive review. Materials and Manufacturing Processes, 2012, 27(6): 583-598. DOI:10.1080/10426914.2011.585505 (  0) 0) |
| [11] |
Liang X, Liu Z. Experimental investigations on effects of tool flank wear on surface integrity during orthogonal dry cutting of Ti-6Al-4V. International Journal of Advanced Manufacturing Technology, 2017, 93(5-8): 1617-1626. DOI:10.1007/s00170-017-0654-x (  0) 0) |
| [12] |
Wang B, Liu Z. Influences of tool structure, tool material and tool wear on machined surface integrity during turning and milling of titanium and nickel alloys: a review. International Journal of Advanced Manufacturing Technology, 2018, 98(5-8): 1925-1975. DOI:10.1007/s00170-018-2314-1 (  0) 0) |
| [13] |
Yue C X, Zhu L, Feng L, et al. Influence of tool wear on residual stress and fatigue life of workpiece in hard cutting process. Journal of Harbin Institute of Technology (New Series), 2018, 25(5): 61-69. DOI:10.11916/j.issn.1005-9113.17031 (  0) 0) |
| [14] |
Sastry C C, Hariharan P, Pradeep Kumar M. Experimental investigation of dry, wet and cryogenic boring of AA 7075 alloy. Materials and Manufacturing Processes, 2019, 34(7): 814-831. DOI:10.1080/10426914.2019.1605174 (  0) 0) |
| [15] |
Ezugwu E O, Tang S H. Surface abuse when machining cast iron (G-17) and nickel-base superalloy (Inconel 718) with ceramic tools. Journal of Materials Processing Technology, 1995, 55(2): 63-69. DOI:10.1016/0924-0136(95)01786-0 (  0) 0) |
| [16] |
Ezugwu E O, Wang Z M, Okeke C I. Tool life and surface integrity when machining inconel 718 with PVD- and CVD-coated tools. Tribology Transactions, 1999, 42(2): 353-360. DOI:10.1080/10402009908982228 (  0) 0) |
| [17] |
Che-Haron C H. Tool life and surface integrity in turning titanium alloy. Journal of Materials Processing Technology, 2001, 118(1-3): 231-237. DOI:10.1016/S0924-0136(01)00926-8 (  0) 0) |
| [18] |
Sharman A R C, Amarasinghe A, Ridgway K. Tool life and surface integrity aspects when drilling and hole making in Inconel 718. Journal of Materials Processing Technology, 2008, 200(1-3): 424-432. DOI:10.1016/j.jmatprotec.2007.08.080 (  0) 0) |
| [19] |
Arunachalam R M, Mannan M A, Spowage A C. Surface integrity when machining age hardened Inconel 718 with coated carbide cutting tools. International Journal of Machine Tools and Manufacture, 2004, 44(14): 1481-1491. DOI:10.1016/j.ijmachtools.2004.05.005 (  0) 0) |
| [20] |
Bushlya V, Zhou J M, Lenrick F, et al. Characterization of white layer generated when turning aged inconel 718. Procedia Engineering, 2011, 19: 60-66. DOI:10.1016/j.proeng.2011.11.080 (  0) 0) |
| [21] |
Yao C, Wang T, Ren J, et al. A comparative study of residual stress and affected layer in Aermet100 steel grinding with alumina and cBN wheels. International Journal of Advanced Manufacturing Technology, 2014, 74(1-4): 125-137. DOI:10.1007/s00170-014-5955-8 (  0) 0) |
| [22] |
Xin H, Shi Y, Ning L, et al. Residual stress and affected layer in disc milling of titanium alloy. Materials and Manufacturing Processes, 2015, 31(13): 1645-1653. DOI:10.1080/10426914.2015.1090583 (  0) 0) |
| [23] |
Jiang F, Li H W. User's Manual of Metal Cutting Finite Element Simulation Software: AdvantEdge FEM. Beijing: China Machine Press, 2018.
(  0) 0) |
 2022, Vol. 29


